No-Bake Salted Caramel Icebox Cake Will Delight You!

Introduction to No-Bake Salted Caramel Icebox Cake
As a busy mom, I know how precious time can be, especially when it comes to whipping up something sweet. That’s why I absolutely adore this No-Bake Salted Caramel Icebox Cake! It’s a delightful dessert that requires minimal effort but delivers maximum flavor. Imagine layers of creamy goodness and rich salted caramel, all without turning on the oven. Perfect for those hectic days or when you want to impress your loved ones, this cake is a true crowd-pleaser. Trust me, once you try it, you’ll be hooked!
Why You’ll Love This No-Bake Salted Caramel Icebox Cake
This No-Bake Salted Caramel Icebox Cake is a lifesaver for busy days. It’s incredibly easy to make, taking just 20 minutes of prep time. Plus, it requires no baking, which means less mess and more time for you! The combination of creamy filling and luscious salted caramel creates a taste sensation that will have everyone asking for seconds. It’s the perfect dessert for any occasion, and it’s sure to impress!
Ingredients for No-Bake Salted Caramel Icebox Cake
Gathering the right ingredients is the first step to creating this delightful No-Bake Salted Caramel Icebox Cake. Here’s what you’ll need:
- Graham crackers: These provide a crunchy base and a hint of sweetness. You can use regular or honey-flavored for a twist.
- Heavy cream: This is the star of the show! Whipping it creates a light and airy texture that balances the richness of the caramel.
- Powdered sugar: This sweetens the whipped cream without adding graininess. It dissolves easily, making your filling smooth.
- Salted caramel sauce: You can use store-bought for convenience or make your own for a richer flavor. Either way, it’s the key to that irresistible taste!
- Vanilla extract: A splash of this adds depth and warmth to the cream, enhancing the overall flavor.
- Sea salt: A sprinkle on top elevates the dessert, balancing the sweetness with a touch of savory goodness.
For those who want to get creative, consider adding chocolate shavings or fresh fruit as toppings. You can find the exact quantities for each ingredient at the bottom of the article, ready for printing!
How to Make No-Bake Salted Caramel Icebox Cake
Now that you have all your ingredients ready, let’s dive into the fun part—making this No-Bake Salted Caramel Icebox Cake! Follow these simple steps, and you’ll have a stunning dessert that’s sure to impress.
Step 1: Whip the Cream
Start by pouring the heavy cream into a large mixing bowl. Using an electric mixer, whip the cream on medium speed until soft peaks form. This usually takes about 3-5 minutes. You want it to be fluffy but not too stiff. Once you see those lovely peaks, add in the powdered sugar and vanilla extract. Continue whipping until you achieve stiff peaks. This means the cream holds its shape beautifully. Trust me, this creamy base is what makes the cake so dreamy!
Step 2: Prepare the Caramel Mixture
In a separate bowl, take half of your whipped cream and gently fold in the salted caramel sauce. Use a spatula to combine them, being careful not to deflate the whipped cream. You want a smooth, luscious mixture that’s bursting with flavor. This caramel cream will be the heart of your cake, so make sure it’s well mixed. If you’re feeling adventurous, you can even add a pinch of extra sea salt for that perfect sweet-salty balance!
Step 3: Layer the Ingredients
Now comes the fun part—layering! Grab your 9×13 inch dish and start by placing a layer of graham crackers at the bottom. Don’t worry about making it perfect; just cover the base. Next, spread a generous layer of the caramel cream mixture over the crackers. Repeat this process, alternating layers of graham crackers and caramel cream until you run out of ingredients. Finish with a final layer of the caramel cream on top. It should look like a beautiful, creamy masterpiece!
Step 4: Chill the Cake
Once you’ve layered everything, it’s time to let the magic happen. Cover the dish with plastic wrap and pop it in the refrigerator. Let it chill for at least 4 hours, but overnight is even better. This allows the flavors to meld and the cake to set perfectly. When you’re ready to serve, drizzle some extra salted caramel sauce on top and sprinkle with sea salt for that finishing touch. Your No-Bake Salted Caramel Icebox Cake is now ready to be devoured!
Tips for Success
- Make sure your heavy cream is cold for better whipping results.
- Use a spatula to gently fold in the caramel sauce to keep the cream fluffy.
- For a richer flavor, consider using homemade salted caramel sauce.
- Chill the cake overnight for the best texture and flavor.
- Don’t skip the sea salt garnish; it enhances the overall taste!
Equipment Needed
- Mixing bowls: A large bowl for whipping cream and a smaller one for mixing caramel.
- Electric mixer: A hand mixer works great, but a stand mixer can save time.
- Spatula: Essential for folding and spreading the mixtures evenly.
- 9×13 inch dish: Any similar-sized dish will do if you don’t have this exact size.
Variations
- Chocolate Lovers: Add a layer of chocolate ganache between the caramel layers for a rich twist.
- Fruit Infusion: Incorporate fresh berries or sliced bananas between the layers for a fruity burst.
- Nutty Delight: Sprinkle chopped nuts, like pecans or almonds, between layers for added crunch.
- Gluten-Free Option: Use gluten-free graham crackers to make this dessert suitable for gluten-sensitive friends.
- Vegan Version: Substitute heavy cream with coconut cream and use a vegan caramel sauce for a plant-based treat.
Serving Suggestions
- Pair with a scoop of vanilla ice cream for an extra creamy experience.
- Serve alongside fresh fruit, like strawberries or raspberries, for a refreshing contrast.
- Drizzle additional salted caramel sauce over each slice for a stunning presentation.
- Enjoy with a cup of coffee or tea to balance the sweetness.
FAQs about No-Bake Salted Caramel Icebox Cake
Can I make this No-Bake Salted Caramel Icebox Cake ahead of time?
Absolutely! In fact, making it a day in advance is ideal. This allows the flavors to meld beautifully and the cake to set perfectly. Just keep it covered in the fridge until you’re ready to serve.
What can I use instead of graham crackers?
If you don’t have graham crackers on hand, you can use digestive biscuits or even crushed cookies like Oreos for a fun twist. Just remember, the texture will change slightly, but it’ll still be delicious!
How long will leftovers last in the fridge?
Your No-Bake Salted Caramel Icebox Cake can last up to 3 days in the fridge. Just make sure it’s covered well to keep it fresh. But let’s be honest, it’s so good, you might not have any leftovers!
Can I freeze this cake?
Yes, you can freeze it! Just slice it into portions and wrap each piece tightly in plastic wrap. When you’re ready to enjoy, let it thaw in the fridge for a few hours. The texture may change slightly, but it will still taste amazing!
What’s the best way to serve this cake?
For a stunning presentation, drizzle extra salted caramel sauce on top and sprinkle with sea salt just before serving. Pair it with a dollop of whipped cream or a scoop of ice cream for an extra treat!
Final Thoughts
Creating this No-Bake Salted Caramel Icebox Cake is more than just making a dessert; it’s about bringing joy to your table. The ease of preparation allows you to focus on what truly matters—sharing delicious moments with family and friends. Each creamy, caramel-laden slice is a reminder that sweet indulgence doesn’t have to be complicated. Whether it’s a special occasion or a simple weeknight treat, this cake is sure to delight. So, roll up your sleeves, gather your loved ones, and enjoy the delightful experience of making and savoring this heavenly dessert together!
Print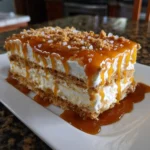
No-Bake Salted Caramel Icebox Cake Will Delight You!
- Total Time: 4 hours 20 minutes
- Yield: 12 servings 1x
- Diet: Vegetarian
Description
A delicious and easy-to-make no-bake dessert featuring layers of salted caramel and creamy filling, perfect for any occasion.
Ingredients
- 1 package of graham crackers
- 2 cups heavy cream
- 1 cup powdered sugar
- 1 cup salted caramel sauce
- 1 teaspoon vanilla extract
- Sea salt for garnish
Instructions
- In a large bowl, whip the heavy cream until soft peaks form.
- Add the powdered sugar and vanilla extract, and continue to whip until stiff peaks form.
- In a separate bowl, mix the salted caramel sauce with half of the whipped cream mixture until well combined.
- In a 9×13 inch dish, layer graham crackers at the bottom.
- Spread a layer of the caramel cream mixture over the graham crackers.
- Repeat the layers until all ingredients are used, finishing with a layer of the caramel cream on top.
- Refrigerate for at least 4 hours or overnight to set.
- Before serving, drizzle additional salted caramel sauce on top and sprinkle with sea salt.
Notes
- For a richer flavor, use homemade salted caramel sauce.
- Allow the cake to chill overnight for the best texture.
- Can be topped with whipped cream or chocolate shavings for extra decoration.
- Prep Time: 20 minutes
- Cook Time: 0 minutes
- Category: Dessert
- Method: No-Bake
- Cuisine: American
Nutrition
- Serving Size: 1 slice
- Calories: 350
- Sugar: 25g
- Sodium: 150mg
- Fat: 25g
- Saturated Fat: 15g
- Unsaturated Fat: 5g
- Trans Fat: 0g
- Carbohydrates: 30g
- Fiber: 1g
- Protein: 3g
- Cholesterol: 80mg
Keywords: No-Bake Salted Caramel Icebox Cake, dessert, easy dessert, salted caramel