Description
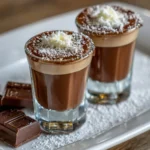
Sip these chocolate coffee snowflake shots! A festive holiday dessert cocktail with Kahlúa & cream. Easy, elegant & perfect for parties.
Ingredients
For the Shot (Makes approximately 6-8 shots, depending on glass size):
-
4 oz Coffee Liqueur: This is the foundational coffee layer. Kahlúa is the classic choice for its smooth, sweet coffee flavor. For a more robust coffee taste, consider Mr. Black Cold Brew Coffee Liqueur, which is less sweet and more coffee-forward.
-
4 oz Vodka: A high-quality, neutral vodka like Absolut or Grey Goose is ideal. It provides a clean, potent kick without competing with the other flavors. For an extra layer of depth, a vanilla vodka can be a wonderful substitution.
-
4 oz Chocolate Liqueur: This creates the rich, middle chocolate layer. Godiva Dark Chocolate Liqueur is excellent, or Crème de Cacao (dark) provides a more traditional, slightly less creamy chocolate flavor.
-
4 oz Irish Cream Liqueur: This forms the top, creamy white “snow” layer. Baileys Original Irish Cream is the standard. For a variation, Carolans or a non-dairy Irish cream alternative can be used.
-
1-2 oz Heavy Cream (Optional, for a whiter top layer): If you want an even more opaque and bright white top layer, a float of plain heavy cream can be used on top of the Irish cream.
For Garnish and Presentation:
-
Shredded Coconut (Sweetened or Unsweetened): This is our “snow.” Toasting it lightly is optional but adds a lovely flavor and texture.
-
White Chocolate Shavings or Cocoa Powder: For additional garnish.
-
Edible Luster Dust (White or Silver): For a magical, frosty sparkle.
-
Homemade Snowflake Stencils: Cut from paper or acetate.
-
6-8 Small Shot Glasses (1.5-2 oz capacity): Chill them in the freezer beforehand for the best results.
Instructions
Step 1: The Foundation Chill
Begin by placing your shot glasses in the freezer for at least 20-30 minutes. A thoroughly chilled glass is crucial for maintaining the distinct layers and providing a refreshing, cold experience. While the glasses chill, prepare your “snow” garnish by placing the shredded coconut in a shallow bowl. If you have luster dust, you can lightly toss the coconut with a pinch of it to make it sparkle.
Step 2: Create the Coffee Base Layer
Remove your chilled shot glasses from the freezer. The first layer is the densest and sweetest: the coffee liqueur. Using a jigger for accuracy, slowly and carefully pour the coffee liqueur (e.g., Kahlúa) into each glass, filling the bottom third. Pouring directly into the center is fine for this layer.
Step 3: The Art of Layering – The Chocolate Heart
This step requires a steady hand and the right tool. To create a clean chocolate layer on top of the coffee, you must use a bar spoon. Hold the spoon upside down, with the bowl just touching the inside of the glass, right above the coffee liqueur. Slowly, painfully slowly, pour the chocolate liqueur over the back of the spoon. The spoon will disperse the liquid, allowing it to float gently on top of the denser coffee liqueur. Fill to about the two-thirds mark.
Step 4: The Frosty Top – The Irish Cream “Snow”
Repeat the exact same spoon-layering technique for the third and final layer. With the bar spoon once again touching the surface of the chocolate layer, slowly pour the Irish cream liqueur (e.g., Baileys) over the spoon. Because it is less dense, it will float beautifully on top of the chocolate, creating a creamy white top layer that represents fresh snow. For an even brighter white, you can do a final, ultra-thin layer of plain heavy cream.
Step 5: The Snowy Garnish – Part 1
Now for the transformative garnish. Take your homemade snowflake stencil and hold it just above the surface of the shot. Using a small spoon or a shaker, gently sprinkle the shredded coconut “snow” through the stencil onto the white top layer. Carefully lift the stencil straight up to reveal a perfect snowflake design. Repeat for each shot.
Step 6: The Final Frosting
For an extra touch of winter magic, use a fine, dry pastry brush to lightly dust the rims of the shot glasses with a tiny amount of edible white luster dust or cocoa powder. You can also add a few white chocolate shavings around the base of the snowflake for texture.
Step 7: Serve and Savor Immediately
Arrange the finished shots on a tray, perhaps lined with a faux-fur or dark blue cloth to mimic a winter nightscape. Instruct your guests to admire the artistry first, and then to sip the shot steadily to experience all the layers at once, or to drink it in one go for a burst of chocolate-coffee-cream bliss.
Notes
-
Jigger (for precise measurement)
-
Bar Spoon (with a spiral handle is easiest for maneuvering)
-
Chilled Shot Glasses
-
Small Bowls (for garnishes)
-
Homemade Snowflake Stencils
- Prep Time: 20 minutes
- Category: Drinks
- Cuisine: American
Nutrition
- Calories: 180 kcal
- Sugar: 15g
- Sodium: 15 mg
- Fat: 3g
- Carbohydrates: 18g
- Protein: <1 g