Chocolate Coffee Snowflake Shots: Festive Holiday Dessert Cocktail!
Introduction to Chocolate Coffee Snowflake Shots
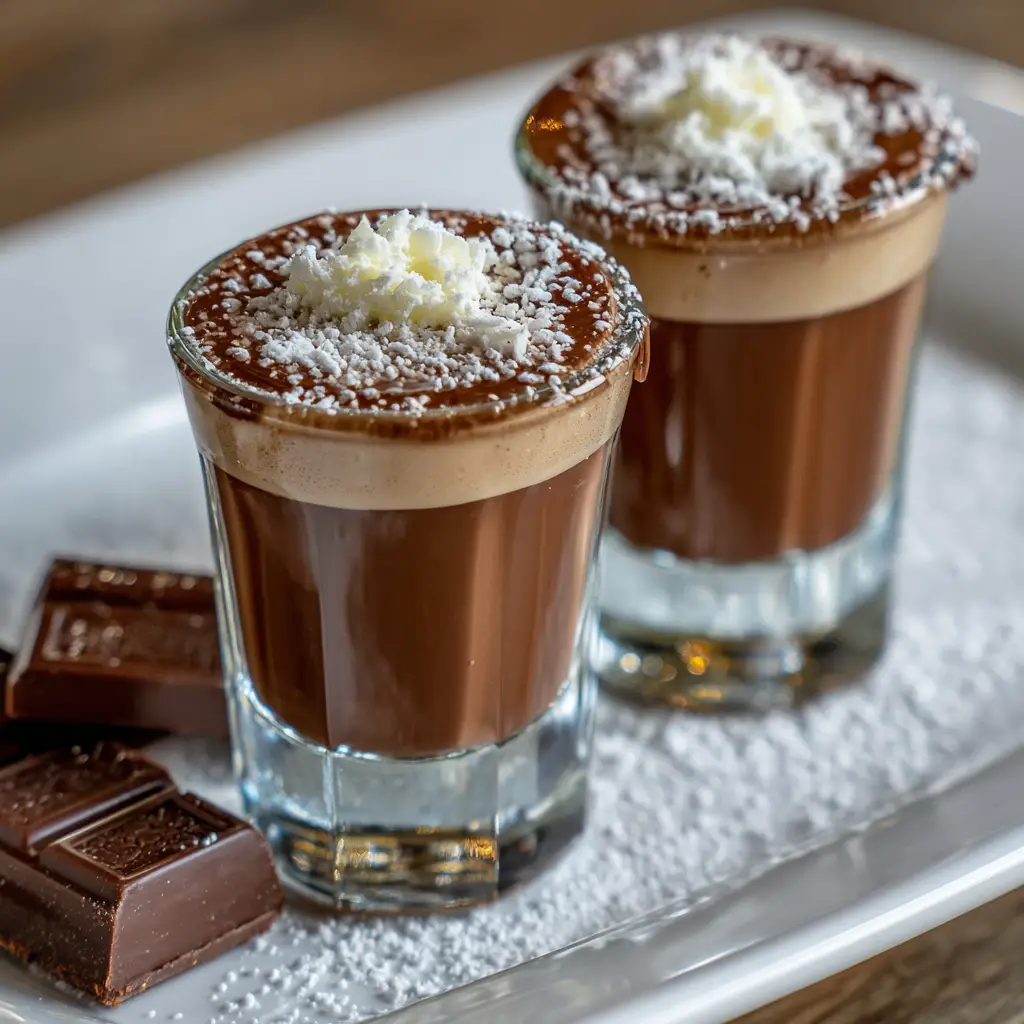
As the winter season wraps the world in a blanket of frost and the air carries a distinct chill, our cravings turn towards rich, warming, and celebratory flavors. The Chocolate Coffee Snowflake Shot is the quintessential embodiment of this seasonal shift, a sophisticated, decadent, and visually stunning concoction designed to be the highlight of any holiday gathering or cozy night in. This is not merely a shot; it is a miniature dessert cocktail, a layered masterpiece that artfully combines the deep, comforting bitterness of coffee with the indulgent, creamy sweetness of chocolate, all finished with a festive, snow-kissed presentation.
Why Is This Chocolate Coffee Snowflake Shots So Popular?
The rise of the Chocolate Coffee Snowflake Shot to its status as a seasonal favorite is a phenomenon built on its ability to satisfy multiple desires simultaneously. Its popularity is rooted in a perfect storm of flavor, aesthetics, and festive spirit.
First and foremost is its irresistible flavor synergy. The combination of chocolate and coffee is one of the most beloved pairings in the culinary world. Coffee has a natural ability to enhance and deepen the flavor of chocolate, making it taste richer and more complex. This shot capitalizes on that timeless duo, creating a familiar yet elevated taste that feels both comforting and exciting. It’s a grown-up version of the hot chocolate and coffee flavors we adored in our youth.
Secondly, its dramatic and festive visual appeal is a massive draw. The careful layering creates a beautiful tri-color effect, and the final garnish of coconut “snow” and a delicate snowflake stencil transforms a simple shot into a work of art. In an era of social media, its photogenic quality is undeniable, making it a star of holiday party feeds and stories. It signals effort, care, and celebration, instantly elevating the mood of any event.
Furthermore, it offers a potent and welcome warmth. Unlike a cold beer or a light wine, this shot is designed for the colder months. The combination of coffee liqueur and vodka provides a soothing, internal warmth that is perfectly suited for a winter’s evening. It’s a liquid blanket, a shot of courage against the cold, and a celebratory toast all rolled into one.
Finally, its versatility and customizability ensure its place on any menu. It can be adjusted for strength, sweetness, and even made non-alcoholic, ensuring that every guest can partake in the festive ritual. It functions equally well as a spirited start to a party, a palate-cleansing intermezzo between dinner courses, or a sweet, decadent finale to a holiday feast.
Why You’ll Love This Chocolate Coffee Snowflake Shots:
- Liquid Dessert in a Glass: You will love the rich, dessert-like quality that satisfies your sweet tooth in a sophisticated, grown-up way.
- A Festive Centerpiece: These shots are guaranteed to be the talk of any holiday party, impressing your guests with their professional and beautiful presentation.
- Perfect Flavor Balance: The harmonious blend of bitter coffee, sweet chocolate, and creamy richness creates a complex flavor profile that is utterly captivating.
- Surprisingly Simple to Master: While they look like they came from a high-end cocktail bar, the technique is easy to learn and execute with stunning results.
- Aromatic and Inviting: The aroma of coffee and chocolate that wafts from these shots is an irresistible invitation to indulge and celebrate.
Here’s what you’ll need:
Precision is key to achieving the signature layers and balanced flavor of this shot. Using high-quality ingredients will make a noticeable difference in the final product.
For the Shot (Makes approximately 6-8 shots, depending on glass size):
- 4 oz Coffee Liqueur: This is the foundational coffee layer. Kahlúa is the classic choice for its smooth, sweet coffee flavor. For a more robust coffee taste, consider Mr. Black Cold Brew Coffee Liqueur, which is less sweet and more coffee-forward.
- 4 oz Vodka: A high-quality, neutral vodka like Absolut or Grey Goose is ideal. It provides a clean, potent kick without competing with the other flavors. For an extra layer of depth, a vanilla vodka can be a wonderful substitution.
- 4 oz Chocolate Liqueur: This creates the rich, middle chocolate layer. Godiva Dark Chocolate Liqueur is excellent, or Crème de Cacao (dark) provides a more traditional, slightly less creamy chocolate flavor.
- 4 oz Irish Cream Liqueur: This forms the top, creamy white “snow” layer. Baileys Original Irish Cream is the standard. For a variation, Carolans or a non-dairy Irish cream alternative can be used.
- 1-2 oz Heavy Cream (Optional, for a whiter top layer): If you want an even more opaque and bright white top layer, a float of plain heavy cream can be used on top of the Irish cream.
For Garnish and Presentation:
- Shredded Coconut (Sweetened or Unsweetened): This is our “snow.” Toasting it lightly is optional but adds a lovely flavor and texture.
- White Chocolate Shavings or Cocoa Powder: For additional garnish.
- Edible Luster Dust (White or Silver): For a magical, frosty sparkle.
- Homemade Snowflake Stencils: Cut from paper or acetate.
- 6-8 Small Shot Glasses (1.5-2 oz capacity): Chill them in the freezer beforehand for the best results.
How to Make Chocolate Coffee Snowflake Shots:
Now that you have your ingredients ready, let’s dive into the steps for making this delightful Chocolate Coffee Snowflake Shots. It’s as easy as pie, and I promise you’ll feel like a culinary superstar!
Step 1: The Foundation Chill
Begin by placing your shot glasses in the freezer for at least 20-30 minutes. A thoroughly chilled glass is crucial for maintaining the distinct layers and providing a refreshing, cold experience. While the glasses chill, prepare your “snow” garnish by placing the shredded coconut in a shallow bowl. If you have luster dust, you can lightly toss the coconut with a pinch of it to make it sparkle.
Step 2: Create the Coffee Base Layer
Remove your chilled shot glasses from the freezer. The first layer is the densest and sweetest: the coffee liqueur. Using a jigger for accuracy, slowly and carefully pour the coffee liqueur (e.g., Kahlúa) into each glass, filling the bottom third. Pouring directly into the center is fine for this layer.
Step 3: The Art of Layering – The Chocolate Heart
This step requires a steady hand and the right tool. To create a clean chocolate layer on top of the coffee, you must use a bar spoon. Hold the spoon upside down, with the bowl just touching the inside of the glass, right above the coffee liqueur. Slowly, painfully slowly, pour the chocolate liqueur over the back of the spoon. The spoon will disperse the liquid, allowing it to float gently on top of the denser coffee liqueur. Fill to about the two-thirds mark.
Step 4: The Frosty Top – The Irish Cream “Snow”
Repeat the exact same spoon-layering technique for the third and final layer. With the bar spoon once again touching the surface of the chocolate layer, slowly pour the Irish cream liqueur (e.g., Baileys) over the spoon. Because it is less dense, it will float beautifully on top of the chocolate, creating a creamy white top layer that represents fresh snow. For an even brighter white, you can do a final, ultra-thin layer of plain heavy cream.
Step 5: The Snowy Garnish – Part 1
Now for the transformative garnish. Take your homemade snowflake stencil and hold it just above the surface of the shot. Using a small spoon or a shaker, gently sprinkle the shredded coconut “snow” through the stencil onto the white top layer. Carefully lift the stencil straight up to reveal a perfect snowflake design. Repeat for each shot.
Step 6: The Final Frosting
For an extra touch of winter magic, use a fine, dry pastry brush to lightly dust the rims of the shot glasses with a tiny amount of edible white luster dust or cocoa powder. You can also add a few white chocolate shavings around the base of the snowflake for texture.
Step 7: Serve and Savor Immediately
Arrange the finished shots on a tray, perhaps lined with a faux-fur or dark blue cloth to mimic a winter nightscape. Instruct your guests to admire the artistry first, and then to sip the shot steadily to experience all the layers at once, or to drink it in one go for a burst of chocolate-coffee-cream bliss.
Tips for Success:
- The Spoon is Sacred: The back-of-the-spoon technique is non-negotiable for clean layers. Do not pour directly.
- Chill Everything: For the sharpest layers, chill your liqueur bottles in the refrigerator for an hour before you start.
- Pour with Painful Slowness: Rushing the layering process is the most common mistake. The slower you pour, the more defined your layers will be.
- Freshness Counts: Ensure your Irish cream is fresh. An old, separated bottle will not pour or layer correctly.
- Practice Makes Perfect: If you’re new to layering, practice with water and different colored juices first to get a feel for the spoon technique.
Equipment Needed:
- Jigger (for precise measurement)
- Bar Spoon (with a spiral handle is easiest for maneuvering)
- Chilled Shot Glasses
- Small Bowls (for garnishes)
- Homemade Snowflake Stencils
- Fine-Mesh Sieve (for dusting cocoa powder)
- Pastry Brush (for luster dust)
Variations of Chocolate Coffee Snowflake Shots:
- The Snowy Mocha Shot: Add ½ oz of cooled espresso or strong cold brew to the coffee liqueur layer for an intensified coffee kick.
- Peppermint Bark Shot: Add ¼ tsp of peppermint extract to the chocolate liqueur layer and garnish with a small piece of crushed candy cane on top of the “snow.”
- Spiced Winter Shot: Infuse the vodka with a cinnamon stick and a clove for 24 hours before using, or add a dash of cinnamon to the chocolate layer.
- Frozen Blended Shot: Blend all ingredients with a cup of ice until smooth, then pour into glasses and top with the coconut snow.
- Non-Alcoholic Version: Use non-alcoholic coffee syrup, a chocolate syrup, and a non-dairy creamer or whipping cream flavored with a touch of vanilla and sugar. The layering technique remains the same.
Serving Suggestions for Chocolate Coffee Snowflake Shots:
These shots are a dessert unto themselves, but they can be part of a larger winter wonderland spread.
- Perfect Pairings: Serve alongside other holiday treats like gingerbread cookies, shortbread snowballs, dark chocolate truffles, or a cheese board with robust cheeses.
- Thematic Presentation: Serve on a tray scattered with fake snow, pine cones, and cinnamon sticks. A backdrop of twinkling fairy lights will enhance the magical ambiance.
- The Shot Tower: Create a dramatic centerpiece by building a pyramid of these stunning shots on a cake stand.
Prep Time:
20 minutes (including garnishing time)
Cooking Time:
0 minutes
Total Time:
20 minutes
Nutritional Information (Approximate per 2 oz shot):
- Calories: ~150-180 kcal
- Protein: <1 g
- Sodium: 15 mg
- Sugar: 15 g
- Fat: 3 g
- Carbohydrates: 18 g
- Fiber: 0 g
Please note: This is an estimate and can vary significantly based on the specific brands and proportions of ingredients you use.
FAQs about Chocolate Coffee Snowflake Shots:
Q: My layers keep mixing together. What am I doing wrong?
A: The most common reasons are: 1) Pouring too quickly and without the bar spoon, 2) Using warm ingredients or warm glasses, 3) The liqueurs are too similar in density. Ensure everything is cold and pour slowly over the spoon.
Q: Can I make a large batch of this in a pitcher?
A: It is not recommended. The layers will not hold, and the presentation is a key part of the experience. They are best assembled individually just before serving.
Q: I don’t have all the different liqueurs. Can I simplify it?
A: You can make a two-layer version by skipping the chocolate layer. Simply pour coffee liqueur as the base and carefully layer Irish cream on top. It will still be delicious and look festive with the snowflake garnish.
Q: How far in advance can I make these?
A: They are best made immediately before serving. If you need to prep ahead, you can mix the coffee liqueur and vodka together and have it ready, then do the layering with the chocolate and Irish cream at the last minute.
Q: What can I use if I don’t have a bar spoon?
A: The rounded back of a regular teaspoon can work in a pinch. The key is to have a curved surface to slow and disperse the pour.
Final Thoughts:
The Chocolate Coffee Snowflake Shot is a triumphant celebration of winter in a glass. It masterfully combines the art of mixology with the joyful spirit of the holiday season, resulting in a drink that is as delightful to behold as it is to consume. The process of creating these miniature layered masterpieces is a rewarding ritual, a creative act that builds anticipation for the festive moment of the toast. While it requires a bit of patience and precision, the result, a perfectly balanced, visually stunning shot that elicits gasps of delight from your guests—is worth every second of effort. So, embrace the season, gather your finest liqueurs, and prepare to transform your next gathering into an unforgettable winter wonderland, one magical, snow-kissed shot at a time. Cheers to the frosty, flavorful joys of winter!
Print
Chocolate Coffee Snowflake Shots: Festive Holiday Dessert Cocktail!
- Total Time: 20 minutes
Description
Sip these chocolate coffee snowflake shots! A festive holiday dessert cocktail with Kahlúa & cream. Easy, elegant & perfect for parties.
Ingredients
For the Shot (Makes approximately 6-8 shots, depending on glass size):
-
4 oz Vodka: A high-quality, neutral vodka like Absolut or Grey Goose is ideal. It provides a clean, potent kick without competing with the other flavors. For an extra layer of depth, a vanilla vodka can be a wonderful substitution.
-
4 oz Chocolate Liqueur: This creates the rich, middle chocolate layer. Godiva Dark Chocolate Liqueur is excellent, or Crème de Cacao (dark) provides a more traditional, slightly less creamy chocolate flavor.
-
4 oz Irish Cream Liqueur: This forms the top, creamy white “snow” layer. Baileys Original Irish Cream is the standard. For a variation, Carolans or a non-dairy Irish cream alternative can be used.
-
1-2 oz Heavy Cream (Optional, for a whiter top layer): If you want an even more opaque and bright white top layer, a float of plain heavy cream can be used on top of the Irish cream.
4 oz Coffee Liqueur: This is the foundational coffee layer. Kahlúa is the classic choice for its smooth, sweet coffee flavor. For a more robust coffee taste, consider Mr. Black Cold Brew Coffee Liqueur, which is less sweet and more coffee-forward.
For Garnish and Presentation:
-
White Chocolate Shavings or Cocoa Powder: For additional garnish.
-
Edible Luster Dust (White or Silver): For a magical, frosty sparkle.
-
Homemade Snowflake Stencils: Cut from paper or acetate.
-
6-8 Small Shot Glasses (1.5-2 oz capacity): Chill them in the freezer beforehand for the best results.
Shredded Coconut (Sweetened or Unsweetened): This is our “snow.” Toasting it lightly is optional but adds a lovely flavor and texture.
Instructions
Step 1: The Foundation Chill
Begin by placing your shot glasses in the freezer for at least 20-30 minutes. A thoroughly chilled glass is crucial for maintaining the distinct layers and providing a refreshing, cold experience. While the glasses chill, prepare your “snow” garnish by placing the shredded coconut in a shallow bowl. If you have luster dust, you can lightly toss the coconut with a pinch of it to make it sparkle.
Step 2: Create the Coffee Base Layer
Remove your chilled shot glasses from the freezer. The first layer is the densest and sweetest: the coffee liqueur. Using a jigger for accuracy, slowly and carefully pour the coffee liqueur (e.g., Kahlúa) into each glass, filling the bottom third. Pouring directly into the center is fine for this layer.
Step 3: The Art of Layering – The Chocolate Heart
This step requires a steady hand and the right tool. To create a clean chocolate layer on top of the coffee, you must use a bar spoon. Hold the spoon upside down, with the bowl just touching the inside of the glass, right above the coffee liqueur. Slowly, painfully slowly, pour the chocolate liqueur over the back of the spoon. The spoon will disperse the liquid, allowing it to float gently on top of the denser coffee liqueur. Fill to about the two-thirds mark.
Step 4: The Frosty Top – The Irish Cream “Snow”
Repeat the exact same spoon-layering technique for the third and final layer. With the bar spoon once again touching the surface of the chocolate layer, slowly pour the Irish cream liqueur (e.g., Baileys) over the spoon. Because it is less dense, it will float beautifully on top of the chocolate, creating a creamy white top layer that represents fresh snow. For an even brighter white, you can do a final, ultra-thin layer of plain heavy cream.
Step 5: The Snowy Garnish – Part 1
Now for the transformative garnish. Take your homemade snowflake stencil and hold it just above the surface of the shot. Using a small spoon or a shaker, gently sprinkle the shredded coconut “snow” through the stencil onto the white top layer. Carefully lift the stencil straight up to reveal a perfect snowflake design. Repeat for each shot.
Step 6: The Final Frosting
For an extra touch of winter magic, use a fine, dry pastry brush to lightly dust the rims of the shot glasses with a tiny amount of edible white luster dust or cocoa powder. You can also add a few white chocolate shavings around the base of the snowflake for texture.
Step 7: Serve and Savor Immediately
Arrange the finished shots on a tray, perhaps lined with a faux-fur or dark blue cloth to mimic a winter nightscape. Instruct your guests to admire the artistry first, and then to sip the shot steadily to experience all the layers at once, or to drink it in one go for a burst of chocolate-coffee-cream bliss.
Notes
-
Jigger (for precise measurement)
-
Bar Spoon (with a spiral handle is easiest for maneuvering)
-
Chilled Shot Glasses
-
Small Bowls (for garnishes)
-
Homemade Snowflake Stencils
- Prep Time: 20 minutes
- Category: Drinks
- Cuisine: American
Nutrition
- Calories: 180 kcal
- Sugar: 15g
- Sodium: 15 mg
- Fat: 3g
- Carbohydrates: 18g
- Protein: <1 g