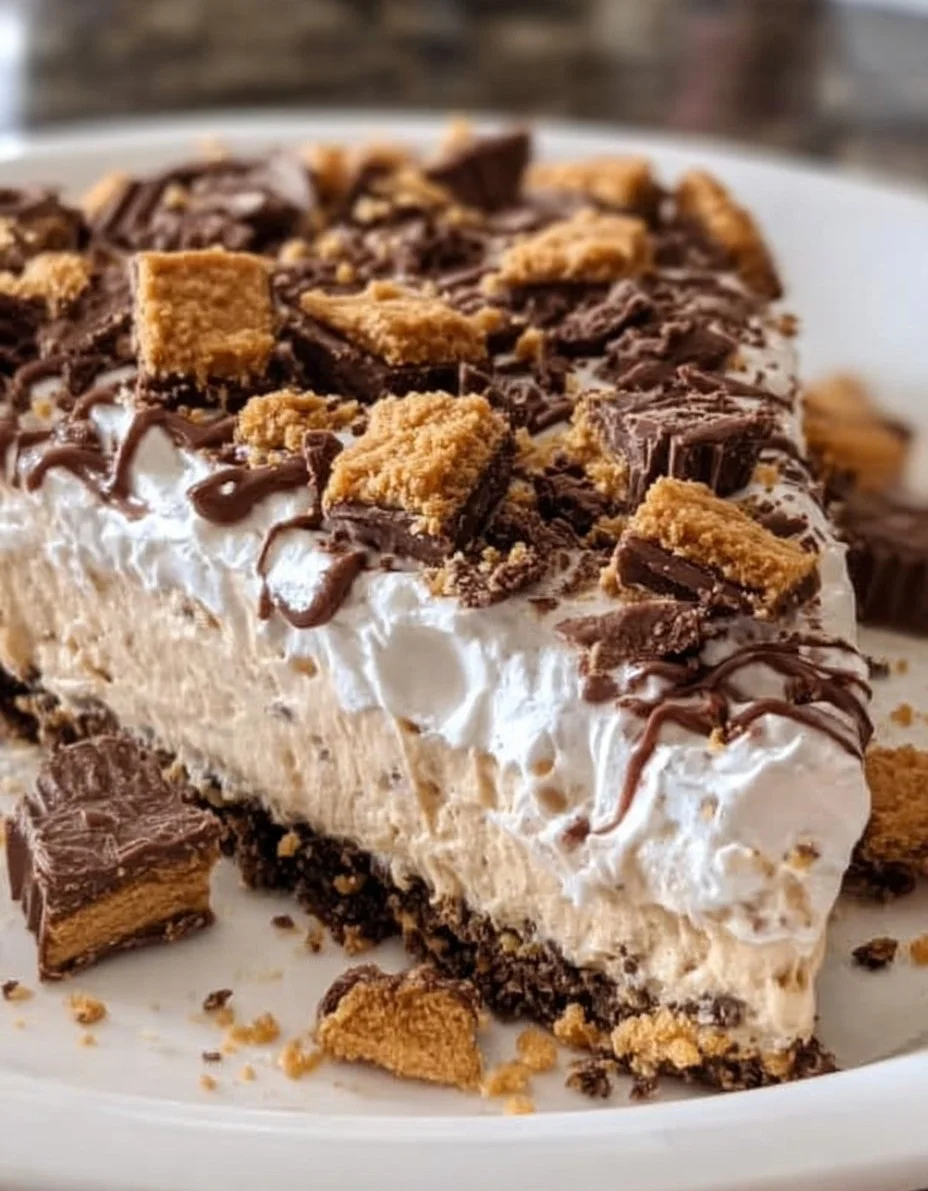
No Bake Reese’s Peanut Butter Pie
The moment you sink your fork into a slice of No Bake Reese’s Peanut Butter Pie, a symphony of flavors effortlessly dances across your taste buds. The silky-smooth peanut butter filling envelops your senses, inviting you into a blissful world of creamy indulgence. Each bite yields the irresistible crunch of a buttery cookie crust, delivering a textural contrast that elevates the experience to a whole new level. You breathe in the warm, nutty aroma that wafts through the kitchen, teasing your anticipation. And as you savor the last morsel, the delightful sweetness lingers perfectly, coaxing an irresistible smile to your face, inviting you to take just one more bite.
This exquisite dessert serves as a testament to the magic that happens when rich peanut butter meets fluffy cream and decadent chocolate. It holds the power to transform ordinary gatherings into extraordinary celebrations. Imagine serving this delightful pie at a birthday party, a summer cookout under the stars, or simply as a sweet treat that makes a typical Tuesday feel special. Friends and family will gather around, mesmerized by its beauty and amazed by its flavors, leaving satisfied sighs and joyful memories in its wake.
Why You’ll Love This No Bake Reese’s Peanut Butter Pie
There’s just something enchanting about a dessert that requires no baking while still offering a flavor profile that dazzles the senses. This No Bake Reese’s Peanut Butter Pie combines the nostalgic taste of childhood treats with a modern twist that is completely satisfying. You’ll relish the effortless preparation, making it a go-to choice for both casual family nights and grand celebrations alike.
Its rich peanut butter filling stands tall on the plate, balanced perfectly by the sweetness of powdered sugar and the creaminess of vanilla-infused cream cheese. Every spoonful combines smooth and crunchy textures, creating a delicious harmony that leaves you hungry for more. With an array of peanut butter cups adorning the top, this pie is not only a feast for the palate, but also a feast for the eyes. It truly shines when you want to impress—whether it’s a holiday gathering, a potluck, or just a cozy evening at home.
Preparation Phase & Tools to Use
Before diving into your peanut butter masterpiece, gather your essential tools to streamline the process. Having the right kitchen equipment on hand not only smooths out each step but also ensures a delightful outcome.
- Mixing Bowls: A set of mixing bowls in different sizes allows you to combine your crust and filling without cross-contamination.
- Hand Mixer: This handy tool whips the cream cheese and peanut butter into a smooth perfection that a simple whisk could only dream of achieving.
- Spatula: A sturdy rubber spatula allows you to fold ingredients with ease, making sure everything blends beautifully without losing that light, airy quality.
- Pie Dish: A glass or ceramic pie dish not only presents beautifully but also holds your dessert securely as it sets in the refrigerator.
Make sure to prep your work surface and have all ingredients at room temperature for optimal mixing. A little organization goes a long way in achieving culinary success!
Ingredients for No Bake Reese’s Peanut Butter Pie
- 1 1/2 cups of crushed no-bake cookies: These provide a delightful base for your pie, lending a sweet and buttery flavor. If you’re looking for a gluten-free option, you could easily substitute with crushed gluten-free cookies.
- 1/2 cup of butter, melted: This binds the crust together and adds richness.
- 1 cup of creamy peanut butter: The star of this dessert, creamy peanut butter offers a wonderful texture. For a fun twist, try crunchy peanut butter for added crunch.
- 1 cup of powdered sugar: This sweetens the filling and plays a role in achieving that velvety texture.
- 1 teaspoon of vanilla extract: A splash of vanilla enhances the overall flavor profile.
- 8 oz of cream cheese, softened: Cream cheese provides creaminess and a tangy kick that balances the sweetness.
- 1 cup of whipped cream or whipped topping: This lightens the filling, ensuring every bite is airy and satisfying.
- Peanut butter cups, for topping: These are the ultimate finishing touch, adding bursts of chocolatey peanut flavor.
How to Make No Bake Reese’s Peanut Butter Pie
-
Prepare the crust: In a mixing bowl, combine the crushed no-bake cookies and melted butter until the mixture resembles damp sand. Press the mixture firmly into the bottom of your pie dish, forming an even layer. This will create a solid base for your delicious filling.
-
Make the filling: In another bowl, add the creamy peanut butter, powdered sugar, vanilla extract, and softened cream cheese. Using a hand mixer, beat until smooth and fluffy, for about 3-4 minutes. The mixture should have a creamy texture without any lumps.
-
Incorporate the whipped cream: Gently fold in the whipped cream until just combined. Use a spatula and make sure not to overmix. This technique helps maintain the lightness of the filling.
-
Pour into the crust: Next, pour the luscious peanut butter mixture into the prepared crust. Spread it evenly with your spatula, ensuring every corner is filled with creamy goodness.
-
Chill to set: Cover your pie with plastic wrap and place it in the refrigerator. Allow it to chill for at least 4 hours—this helps the filling firm up beautifully and develop flavor.
-
Add toppings: When you’re ready to serve, generously sprinkle chopped peanut butter cups over the top of the pie, adding visual flair and irresistible crunch.
Chef’s Notes & Helpful Tips
-
Make-ahead tips: You can easily prepare this pie a day in advance. It keeps well in the refrigerator, and the flavors deepen overnight.
-
Cooking alternatives: In a pinch, you can prepare individual servings of this dessert in small glasses instead of a pie for easy serving at parties.
-
Customization ideas: Consider adding a layer of chocolate sauce or a sprinkle of sea salt on top for an extra flavor boost. If you love a hint of coffee, mix in a small amount of instant coffee granules into the filling.
Common Mistakes to Avoid
-
Skipping the chilling time: Allowing the pie to set in the refrigerator is crucial. If you cut it too early, the filling might be too soft and oozy.
-
Not softening the cream cheese: If the cream cheese isn’t softened completely, it will create lumps in your filling. Always let it sit at room temperature before mixing.
-
Overmixing the whipped cream: Overmixing can lead to a dense texture. Mix until just combined and retain that lightness!
What to Serve With No Bake Reese’s Peanut Butter Pie
- Fresh berries: Juicy strawberries or raspberries add a fruity contrast, brightening the rich flavors of the pie.
- Coffee: A warm cup of coffee complements the sweetness, balancing the dessert beautifully.
- Vanilla ice cream: Serve alongside a scoop of ice cream for that classic pie a la mode experience.
- Chocolate sauce: A drizzle of chocolate sauce elevates the decadent experience further.
- Milk: A traditional pairing with peanut butter treats, a cold glass of milk can cut through the richness of the pie.
- Banana slices: The soft sweetness of banana works in harmony with the pie’s flavors, bringing a delightful twist.
Storage & Reheating Instructions
Refrigerate any leftover pie tightly covered with plastic wrap or foil. It will maintain its delightful texture for up to 4 days in the fridge. For longer storage, consider freezing the pie. Wrap it well, and it can last up to 2 months, ensuring you have a sweet treat ready whenever the craving hits. Simply thaw the pie overnight in the refrigerator before serving; there’s no need to heat this refreshing dessert!
Estimated Nutrition Information
Approximate values per slice (serving size: 1/8 of pie):
- Calories: 360
- Total Fat: 25g
- Saturated Fat: 12g
- Carbohydrates: 30g
- Sugars: 20g
- Protein: 6g
These values may vary depending on specific ingredient brands and measurements, so consider them a general guide.
FAQs
Can I use natural peanut butter?
Yes, you can use natural peanut butter, but be mindful that it tends to be less sweet than traditional creamy peanut butter. You may need to adjust the powdered sugar accordingly to achieve your desired sweetness.
How do I know when the pie is set?
The pie should be firm to the touch but will retain a slight softness as it is filled with whipped cream and peanut butter. After the chilling time, gently press the center with a clean finger, and it should spring back slightly.
Can I freeze the pie?
Absolutely! This pie freezes well. Just remember to wrap it tightly to prevent freezer burn. Thaw it in the refrigerator for a few hours before serving for the best texture.
Can I add chocolate to the filling?
For sure! You can mix in melted chocolate or cocoa powder into the filling. Just make sure to adjust the sweetness if you use unsweetened cocoa powder.
What’s the best way to slice the pie?
Warm the knife slightly in hot water, then wipe it dry. This technique will help you slice the pie more cleanly without ruining the layers.
Conclusion
There’s no denying the comfort and joy that a slice of No Bake Reese’s Peanut Butter Pie brings. From its rich flavors to its delightful textures, it creates lasting memories around the table, where family and friends gather. So why not indulge in a little sweetness? Recreate this easy, no-bake masterpiece and watch as it becomes a cherished favorite in your home, just waiting to be revealed at your next gathering. Grab your ingredients, gather your loved ones, and prepare yourselves for a treat that will leave everyone asking for seconds. Enjoy!
Print
No Bake Reese’s Peanut Butter Pie
- Total Time: 255 minutes
- Yield: 8 servings 1x
- Diet: Vegetarian
Description
A rich and creamy no-bake dessert featuring a smooth peanut butter filling and a crunchy cookie crust, topped with peanut butter cups.
Ingredients
- 1 1/2 cups of crushed no-bake cookies
- 1/2 cup of butter, melted
- 1 cup of creamy peanut butter
- 1 cup of powdered sugar
- 1 teaspoon of vanilla extract
- 8 oz of cream cheese, softened
- 1 cup of whipped cream or whipped topping
- Peanut butter cups, for topping
Instructions
- Prepare the crust: In a mixing bowl, combine the crushed no-bake cookies and melted butter until the mixture resembles damp sand. Press the mixture firmly into the bottom of your pie dish, forming an even layer.
- Make the filling: In another bowl, add the creamy peanut butter, powdered sugar, vanilla extract, and softened cream cheese. Using a hand mixer, beat until smooth and fluffy, for about 3-4 minutes.
- Incorporate the whipped cream: Gently fold in the whipped cream until just combined, careful not to overmix.
- Pour into the crust: Pour the peanut butter mixture into the prepared crust and spread it evenly.
- Chill to set: Cover with plastic wrap and place in the refrigerator for at least 240 minutes.
- Add toppings: Sprinkle chopped peanut butter cups over the top when ready to serve.
Notes
This pie can be made a day in advance; it keeps well for several days in the refrigerator. For individual servings, consider using small glasses.
- Prep Time: 15 minutes
- Cook Time: 0 minutes
- Category: Dessert
- Method: No Bake
- Cuisine: American
Nutrition
- Serving Size: 1 serving
- Calories: 360
- Sugar: 20g
- Sodium: 200mg
- Fat: 25g
- Saturated Fat: 12g
- Unsaturated Fat: 8g
- Trans Fat: 0g
- Carbohydrates: 30g
- Fiber: 1g
- Protein: 6g
- Cholesterol: 30mg
Keywords: no bake dessert, peanut butter pie, easy dessert, creamy pie, party dessert