Peanut Butter Cups: Discover Your New Favorite Treat!
Introduction to Peanut Butter Cups
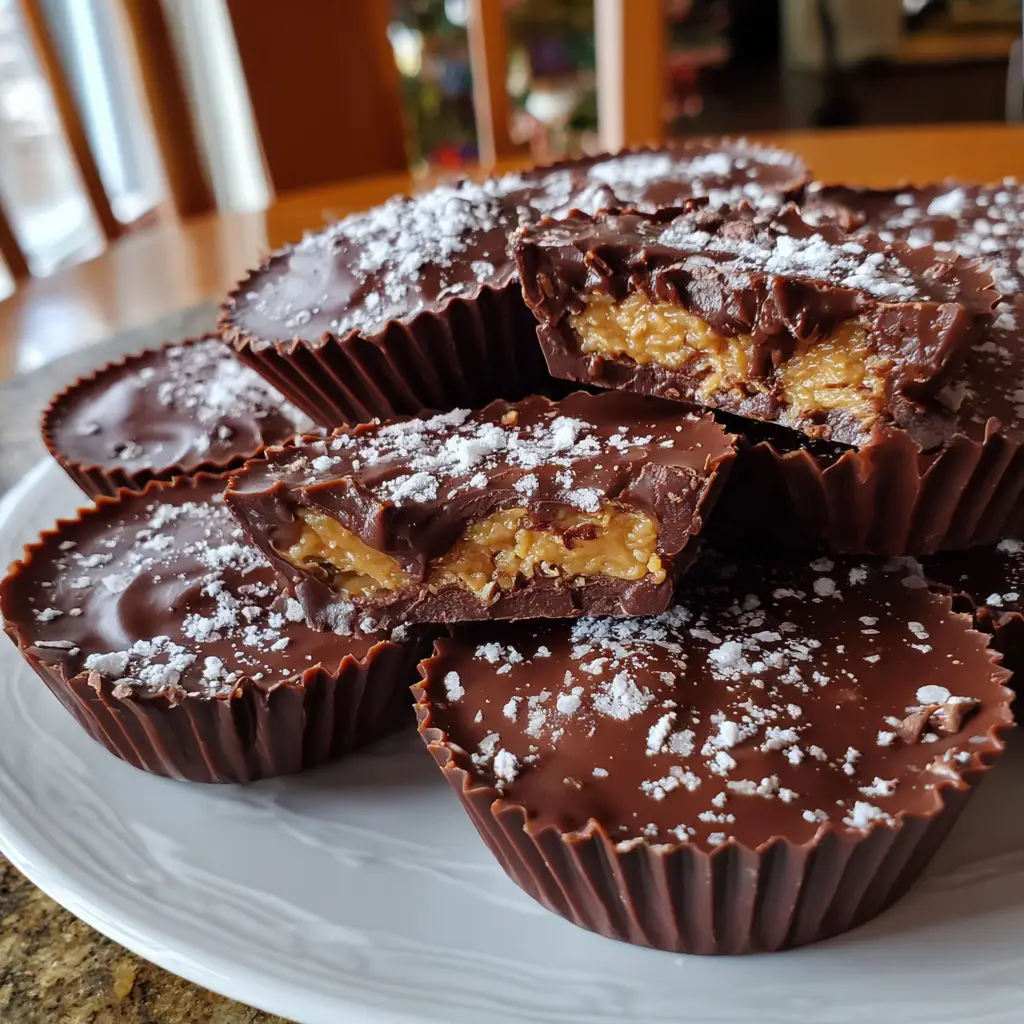
As a busy mom, I know how precious time can be, especially when it comes to satisfying that sweet tooth. That’s why I absolutely adore these homemade peanut butter cups! They’re not just a treat; they’re a quick solution for those hectic days when you need a little indulgence. Imagine biting into a creamy, chocolatey delight that melts in your mouth, bringing a smile to your face. This recipe is perfect for impressing your loved ones or simply treating yourself after a long day. Trust me, once you try these, they’ll become your new favorite go-to dessert!
Why You’ll Love This Peanut Butter Cups
These peanut butter cups are a dream come true for anyone short on time but big on flavor. They come together in just 15 minutes of prep, making them a perfect last-minute dessert. Plus, the combination of creamy peanut butter and rich chocolate is simply irresistible. Whether you’re treating yourself or sharing with family, these homemade delights will surely bring joy to your day!
Ingredients for Peanut Butter Cups
Let’s dive into the delicious world of peanut butter cups! Here’s what you’ll need to create these delightful treats:
- Creamy Peanut Butter: The star of the show! It adds that rich, nutty flavor and smooth texture that pairs perfectly with chocolate.
- Powdered Sugar: This sweetener gives the peanut butter mixture its delightful sweetness and helps achieve that creamy consistency.
- Milk Chocolate Chips: These are melted to create a luscious chocolate layer. If you prefer a deeper flavor, feel free to swap them for dark chocolate chips!
- Coconut Oil: This ingredient helps the chocolate melt smoothly and gives it a nice sheen. Plus, it adds a hint of tropical flavor!
For those looking to get creative, consider adding a pinch of sea salt on top for an extra flavor boost. You can also experiment with different nut butters, like almond or cashew, for a unique twist. Remember, the exact quantities of these ingredients are listed at the bottom of the article for your convenience, ready for printing!
How to Make Peanut Butter Cups
Now that we have our ingredients ready, let’s get to the fun part—making these delicious peanut butter cups! Follow these simple steps, and you’ll have a batch of homemade treats in no time.
Step 1: Prepare the Peanut Butter Mixture
Start by grabbing a mixing bowl. Add your creamy peanut butter and powdered sugar. Using a spatula or a wooden spoon, mix them together until the mixture is smooth and well combined. It should be thick but spreadable, like a fluffy cloud of peanut butter goodness!
Step 2: Melt the Chocolate
Next, it’s time to melt the chocolate. You can do this in a microwave-safe bowl or a double boiler. If using the microwave, heat the chocolate chips and coconut oil in 30-second intervals, stirring in between. This helps prevent burning. If you’re using a double boiler, just let the steam do the work. Either way, you want it silky and smooth!
Step 3: Line the Muffin Tin
Now, take a muffin tin and line it with cupcake liners. This makes it easy to pop out the peanut butter cups later. Plus, it adds a cute touch! Make sure the liners are snug in the tin so they hold their shape.
Step 4: Layer the Chocolate
Pour a small amount of the melted chocolate into the bottom of each liner. Just enough to cover the bottom, about a tablespoon should do. This layer is like a warm hug for the peanut butter. Use a spoon to spread it evenly if needed.
Step 5: Add the Peanut Butter
Now, take a spoonful of your peanut butter mixture and place it on top of the chocolate layer. Gently press it down, but don’t squish it too much! You want that lovely chocolate layer to stay intact. This is where the magic happens, so make sure each cup gets a generous dollop!
Step 6: Cover with More Chocolate
Time to finish these beauties! Pour more melted chocolate over the peanut butter layer, covering it completely. Make sure to smooth it out so it looks nice and even. This top layer is what makes these peanut butter cups so irresistible!
Step 7: Refrigerate to Set
Finally, pop the muffin tin into the refrigerator. Let the peanut butter cups chill for about 30 minutes, or until they’re set. This is the hardest part—waiting! But trust me, it’s worth it when you take that first bite.
Tips for Success
- Use room temperature peanut butter for easier mixing.
- Don’t rush the melting process; slow and steady wins the race!
- For a fun twist, try adding crushed nuts or sprinkles on top before refrigerating.
- Make sure to let the chocolate cool slightly before pouring it over the peanut butter.
- Store any leftovers in an airtight container to keep them fresh and delicious.
Equipment Needed
- Muffin Tin: Essential for shaping your peanut butter cups. If you don’t have one, silicone molds work great too!
- Cupcake Liners: These help with easy removal. Parchment paper cutouts can be a handy substitute.
- Mixing Bowl: A medium-sized bowl is perfect for combining ingredients. Any bowl will do in a pinch!
- Microwave or Double Boiler: For melting chocolate. A heatproof bowl over a pot of simmering water works if you lack a double boiler.
Variations
- Dark Chocolate Delight: Swap milk chocolate for dark chocolate chips for a richer flavor that pairs beautifully with peanut butter.
- Nutty Twist: Use almond or cashew butter instead of peanut butter for a unique taste and texture.
- Vegan Option: Choose dairy-free chocolate chips and coconut oil to make these peanut butter cups vegan-friendly.
- Crunchy Add-Ins: Mix in crushed pretzels or toffee bits into the peanut butter mixture for an added crunch.
- Flavor Infusion: Add a splash of vanilla extract or a sprinkle of cinnamon to the peanut butter mixture for an extra layer of flavor.
Serving Suggestions
- Pair your peanut butter cups with a glass of cold milk for a classic treat.
- Serve them alongside fresh fruit, like strawberries or bananas, for a delightful contrast.
- For a fun presentation, arrange them on a decorative plate and sprinkle with sea salt.
- Consider adding a scoop of vanilla ice cream for an indulgent dessert experience.
FAQs about Peanut Butter Cups
As you embark on your peanut butter cup-making adventure, you might have a few questions. Here are some common queries I’ve encountered, along with helpful answers to guide you along the way!
Can I use natural peanut butter for this recipe?
Absolutely! Natural peanut butter works well, but it may be a bit runnier. Just make sure to stir it well before mixing with powdered sugar to achieve a smooth consistency.
How do I store leftover peanut butter cups?
Store your homemade peanut butter cups in an airtight container in the refrigerator. They’ll stay fresh for about a week, but I doubt they’ll last that long!
Can I make these peanut butter cups ahead of time?
Yes! These treats are perfect for meal prep. You can make them a few days in advance and keep them chilled until you’re ready to enjoy.
What can I substitute for coconut oil?
If you don’t have coconut oil, you can use vegetable oil or butter. Just keep in mind that it may slightly alter the flavor and texture.
Can I freeze peanut butter cups?
Definitely! These peanut butter cups freeze beautifully. Just wrap them individually in plastic wrap and store them in a freezer-safe container. They’ll be ready for a sweet treat anytime!
Final Thoughts
Making these homemade peanut butter cups is more than just whipping up a dessert; it’s about creating sweet moments in our busy lives. Each bite is a reminder that we can indulge in simple pleasures, even on the craziest days. Whether you’re sharing them with family or sneaking a few for yourself, these treats bring joy and comfort. Plus, the satisfaction of making something delicious from scratch is unbeatable! So, roll up your sleeves, gather your ingredients, and let the magic of peanut butter cups brighten your day. You deserve it!
Print
Peanut Butter Cups: Discover Your New Favorite Treat!
- Total Time: 45 minutes
- Yield: 12 cups 1x
- Diet: Vegetarian
Description
Delicious homemade peanut butter cups that are easy to make and perfect for satisfying your sweet tooth.
Ingredients
- 1 cup creamy peanut butter
- 1 cup powdered sugar
- 1 1/2 cups milk chocolate chips
- 1 tablespoon coconut oil
Instructions
- In a mixing bowl, combine peanut butter and powdered sugar until smooth.
- Melt the chocolate chips and coconut oil together in a microwave or double boiler.
- Line a muffin tin with cupcake liners.
- Pour a small amount of melted chocolate into the bottom of each liner.
- Add a spoonful of the peanut butter mixture on top of the chocolate.
- Cover the peanut butter with more melted chocolate.
- Refrigerate until set, about 30 minutes.
Notes
- For a darker flavor, use dark chocolate instead of milk chocolate.
- Store in an airtight container in the refrigerator.
- Feel free to add a pinch of sea salt on top for extra flavor.
- Prep Time: 15 minutes
- Cook Time: 10 minutes
- Category: Dessert
- Method: No-Bake
- Cuisine: American
Nutrition
- Serving Size: 1 cup
- Calories: 150
- Sugar: 10g
- Sodium: 50mg
- Fat: 9g
- Saturated Fat: 4g
- Unsaturated Fat: 3g
- Trans Fat: 0g
- Carbohydrates: 15g
- Fiber: 1g
- Protein: 3g
- Cholesterol: 5mg
Keywords: Peanut Butter Cups, Dessert, Treat, Homemade