Witch Hat Cookie Bites: Delightful Treats to Try Now!

Introduction to Witch Hat Cookie Bites
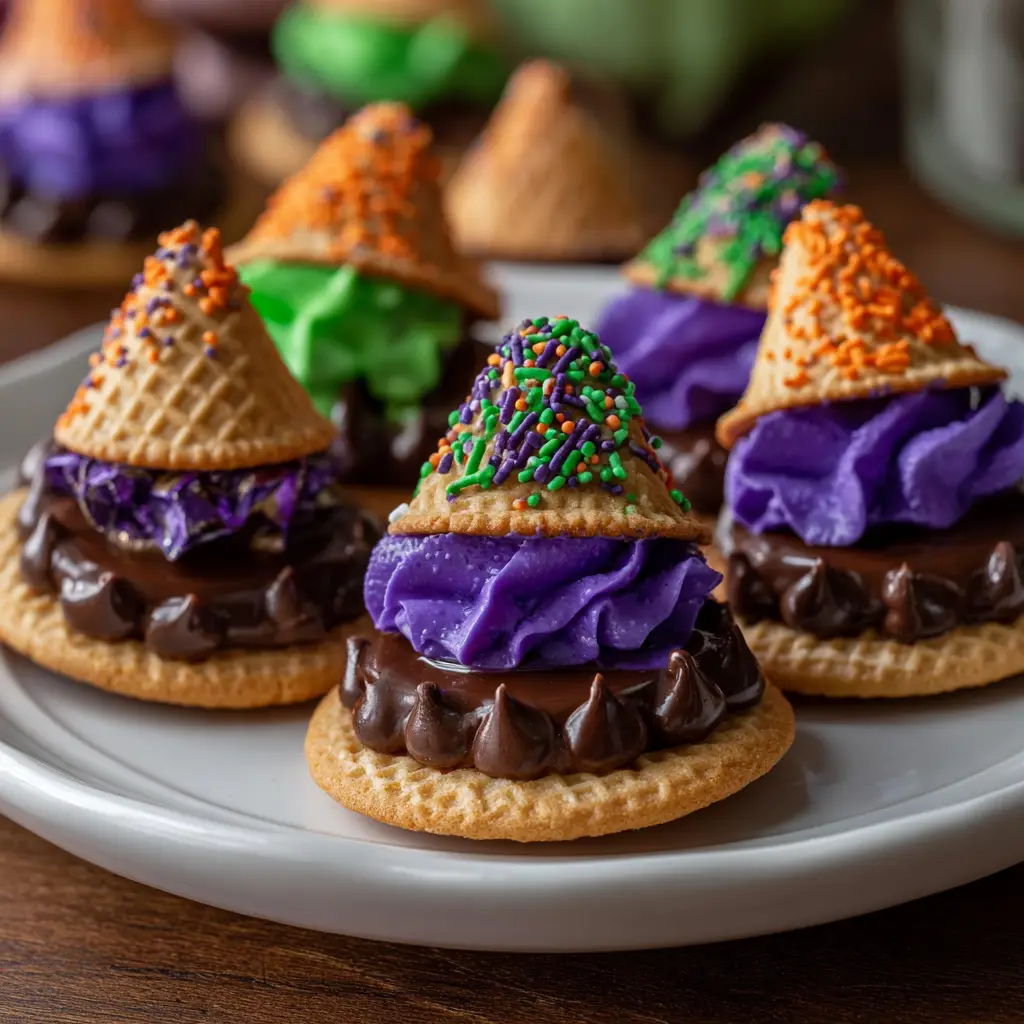
As the leaves turn and the air gets crisp, I find myself dreaming of delightful treats that capture the spirit of Halloween. Enter Witch Hat Cookie Bites! These charming little cookies are not just a feast for the eyes; they’re a quick solution for busy days filled with school events and family gatherings. With just a handful of ingredients, you can whip up these spooky delights that are sure to impress your loved ones. Trust me, these Witch Hat Cookie Bites will become a favorite in your home, bringing smiles and a sprinkle of magic to your celebrations!
Why You’ll Love This Witch Hat Cookie Bites
These Witch Hat Cookie Bites are the perfect blend of ease and fun! With minimal prep time, you can create a spooky treat that tastes as good as it looks. They’re not just quick to make; they’re also a hit with kids and adults alike. Plus, the combination of chocolate cookies and candy corn is simply irresistible. You’ll love how these delightful bites bring joy to your Halloween festivities!
Ingredients for Witch Hat Cookie Bites
To create these enchanting Witch Hat Cookie Bites, you’ll need a few simple ingredients that pack a punch of flavor and fun. Here’s what you’ll gather:
- Chocolate cookies: The base of our witch hats! You can use store-bought or homemade chocolate cookies. They provide a rich, chocolatey flavor that pairs perfectly with the frosting.
- Chocolate frosting: This creamy goodness acts as the glue for our candy corn hats. You can opt for store-bought frosting for convenience or whip up a quick homemade version if you’re feeling adventurous.
- Candy corn: The iconic Halloween treat that gives our cookies their witchy point! Feel free to use traditional candy corn or try the flavored varieties for a fun twist.
- Mini chocolate chips: These little gems add a delightful touch to the base of the candy corn, making your witch hats even more appealing. They also enhance the chocolate flavor!
For those looking to mix things up, consider using different flavored cookies, like peanut butter or vanilla, to create unique variations. You can find all the exact quantities for these ingredients at the bottom of the article, ready for printing. Happy baking!
How to Make Witch Hat Cookie Bites
Making Witch Hat Cookie Bites is a delightful adventure that’s as easy as pie! Follow these simple steps, and you’ll have a spooky treat ready in no time. Let’s dive into the fun of creating these charming cookies!
Step 1: Preheat the Oven
First things first, preheat your oven according to the cookie package instructions. Preheating is crucial because it ensures even baking. If you skip this step, your cookies might end up unevenly cooked, and nobody wants that! So, set that temperature and let the oven warm up while you prepare the rest.
Step 2: Prepare the Cookies
Next, it’s time to prepare the chocolate cookies. Follow the package instructions carefully, mixing the ingredients as directed. Once your dough is ready, scoop it onto a baking sheet lined with parchment paper. Bake until they’re just right, then let them cool completely. Cooling is essential; if you frost them too soon, the frosting will melt and slide right off!
Step 3: Assemble the Witch Hats
Now comes the fun part! Grab your chocolate frosting and a cookie. Use a generous dollop of frosting to attach a piece of candy corn to the top of each cookie. This creates the iconic point of the witch hat. Make sure to press gently so it sticks well. The combination of chocolate and candy corn is a match made in Halloween heaven!
Step 4: Decorate with Mini Chocolate Chips
With your hats assembled, it’s time to get creative! Use more frosting to decorate the base of the candy corn with mini chocolate chips. You can create fun patterns or simply sprinkle them around. This adds a delightful touch and makes your Witch Hat Cookie Bites even more appealing. Let your imagination run wild!
Step 5: Let the Frosting Set
Finally, let the frosting set before serving. This step is important because it helps everything hold together. If you serve them too soon, the frosting might smudge, and we want these treats to look their best! Allow them to sit for about 15-20 minutes, and then they’re ready to be enjoyed!
Tips for Success
- Make sure your cookies are completely cool before frosting to avoid melting.
- Use a piping bag for the frosting to create neat designs.
- Experiment with different cookie flavors for a unique twist.
- Store any leftovers in an airtight container to keep them fresh.
- Get the kids involved! They’ll love decorating their own witch hats.

Equipment Needed
- Baking sheet: A standard one works great, but you can use a stoneware pan if you have it.
- Parchment paper: This helps prevent sticking; aluminum foil can be a substitute.
- Mixing bowl: Any large bowl will do for mixing your cookie dough.
- Spatula: A silicone spatula is perfect for spreading frosting.
- Cookie scoop: This isn’t necessary, but it makes portioning dough easier.
Variations of Witch Hat Cookie Bites
- Flavored Cookies: Swap out chocolate cookies for peanut butter or vanilla cookies for a unique twist on the classic.
- Gluten-Free Option: Use gluten-free chocolate cookies to make these treats suitable for those with dietary restrictions.
- Nut-Free Version: Ensure your cookies and frosting are nut-free, perfect for school events or gatherings with allergies.
- Vegan Adaptation: Choose vegan chocolate cookies and frosting to create a plant-based version of these spooky delights.
- Decorative Toppings: Get creative with toppings! Use sprinkles, edible glitter, or even mini marshmallows for added flair.
Serving Suggestions for Witch Hat Cookie Bites
- Pair these cookies with a warm cup of apple cider for a cozy fall treat.
- Serve alongside a platter of fresh fruit for a colorful contrast.
- Display them on a spooky-themed platter to enhance the Halloween vibe.
- Consider adding a scoop of vanilla ice cream for an indulgent dessert.
- Wrap them in clear bags tied with orange ribbons for a fun party favor!
FAQs about Witch Hat Cookie Bites
As you embark on your baking adventure with Witch Hat Cookie Bites, you might have a few questions. Here are some common queries that can help you along the way!
Can I make Witch Hat Cookie Bites in advance?
Absolutely! These spooky cookies can be made a day in advance. Just store them in an airtight container to keep them fresh. This makes them perfect for busy moms like us who want to get a head start on Halloween festivities!
What can I use instead of candy corn?
If candy corn isn’t your thing, you can use chocolate-covered pretzels or even mini marshmallows for a different look. The key is to find something that adds that fun, witchy point to your cookies!
How do I store leftover Witch Hat Cookie Bites?
To keep your cookies fresh, store them in an airtight container at room temperature. They should last for about 3-5 days, but I doubt they’ll last that long with how delicious they are!
Can I freeze Witch Hat Cookie Bites?
Yes, you can freeze these treats! Just make sure they are completely set before placing them in a freezer-safe container. They can be frozen for up to a month. When you’re ready to enjoy them, let them thaw at room temperature.
What’s the best way to decorate these cookies?
Get creative! Use different colored frosting, sprinkles, or edible glitter to make your Witch Hat Cookie Bites stand out. The more fun you have decorating, the more your family will enjoy eating them!
Final Thoughts
Creating Witch Hat Cookie Bites is more than just baking; it’s about making memories with your loved ones. The joy of seeing their faces light up as they indulge in these delightful treats is priceless. Whether you’re hosting a Halloween party or simply enjoying a cozy night in, these cookies add a sprinkle of magic to any occasion. Plus, the ease of preparation means you can whip them up even on the busiest days. So, gather your ingredients, invite the kids to help, and let the fun begin! Happy baking, and may your Halloween be filled with sweetness!
Print
Witch Hat Cookie Bites: Delightful Treats to Try Now!
- Total Time: 30 minutes
- Yield: 24 cookie bites 1x
- Diet: Vegetarian
Description
Witch Hat Cookie Bites are delightful and spooky treats perfect for Halloween celebrations. These easy-to-make cookies are shaped like witch hats and are sure to impress your guests.
Ingredients
- 1 package of chocolate cookies
- 1 package of chocolate frosting
- 1 package of candy corn
- 1 cup of mini chocolate chips
Instructions
- Preheat your oven according to the cookie package instructions.
- Prepare the chocolate cookies as directed on the package and let them cool completely.
- Once cooled, use chocolate frosting to attach a candy corn to the top of each cookie to create the witch hat point.
- Use additional frosting to decorate the base of the candy corn with mini chocolate chips.
- Let the frosting set before serving.
Notes
- For a fun twist, try using different flavored cookies.
- These cookies can be made a day in advance and stored in an airtight container.
- Feel free to get creative with decorations!
- Prep Time: 20 minutes
- Cook Time: 10 minutes
- Category: Dessert
- Method: Baking
- Cuisine: American
Nutrition
- Serving Size: 1 cookie
- Calories: 120
- Sugar: 10g
- Sodium: 50mg
- Fat: 6g
- Saturated Fat: 3g
- Unsaturated Fat: 2g
- Trans Fat: 0g
- Carbohydrates: 15g
- Fiber: 1g
- Protein: 1g
- Cholesterol: 5mg
Keywords: Witch Hat Cookie Bites, Halloween treats, spooky cookies, easy cookie recipes