Pumpkin Patch Cookie Cups: Delightful Fall Treats to Try!

Introduction to Pumpkin Patch Cookie Cups
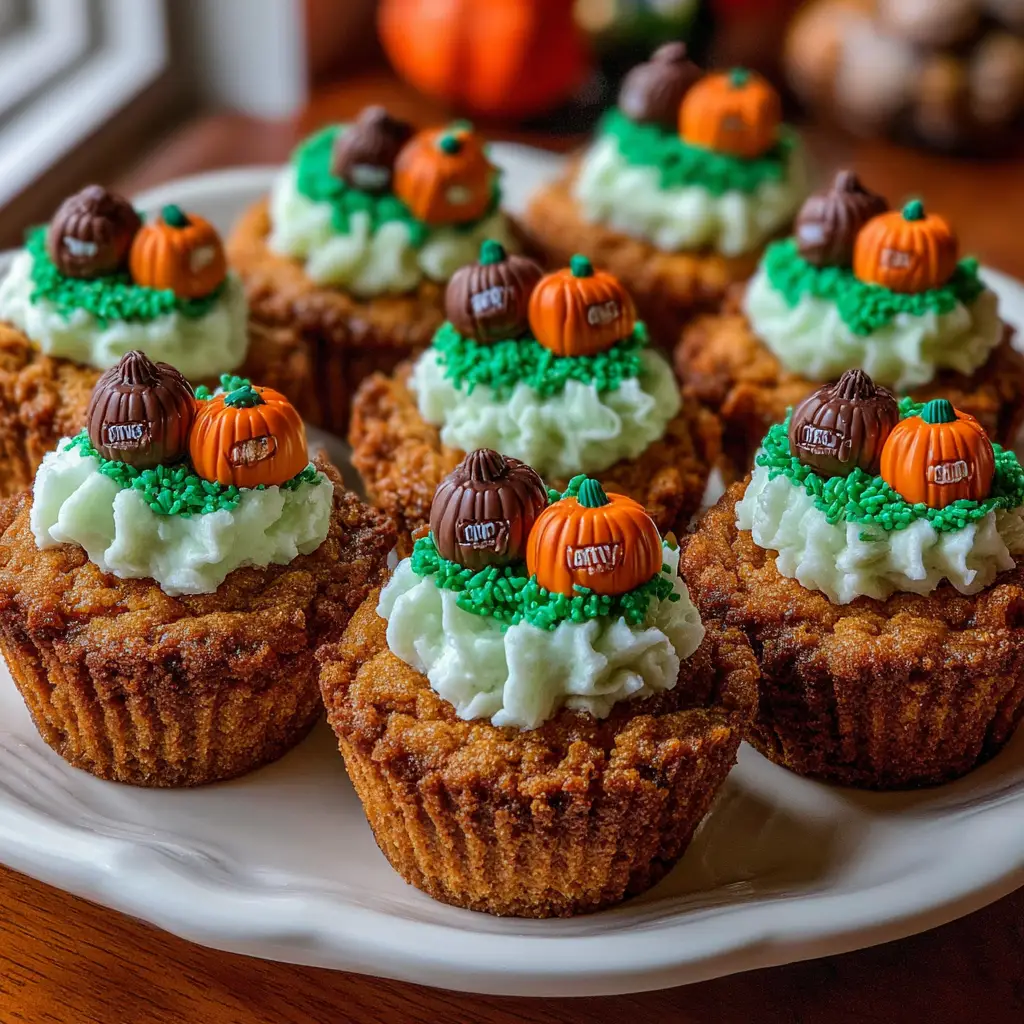
As the leaves turn golden and the air gets crisp, I find myself craving the warm, cozy flavors of fall. That’s where these delightful Pumpkin Patch Cookie Cups come in! They’re not just a treat; they’re a celebration of autumn in every bite. Perfect for busy moms like us, these cookie cups are quick to whip up and sure to impress your loved ones. Whether you’re hosting a gathering or just want to indulge in something sweet, these little delights are the answer. Trust me, they’ll bring smiles to faces and warmth to hearts!
Why You’ll Love This Pumpkin Patch Cookie Cups
These Pumpkin Patch Cookie Cups are a dream come true for busy days! They come together in just 35 minutes, making them a quick solution for unexpected guests or a sweet treat after dinner. The combination of pumpkin and warm spices creates a flavor explosion that’s simply irresistible. Plus, they’re fun to decorate, turning baking into a delightful family activity. Trust me, you’ll love how easy and delicious these treats are!
Ingredients for Pumpkin Patch Cookie Cups
Gathering the right ingredients is the first step to creating these delightful Pumpkin Patch Cookie Cups. Here’s what you’ll need:
- Unsalted butter: This adds richness and helps create a tender texture. Make sure it’s softened for easy mixing.
- Granulated sugar: Sweetens the cookie cups and contributes to their lovely golden color.
- Brown sugar: Packed with moisture, it adds a hint of caramel flavor and keeps the cookie cups soft.
- Large eggs: They bind the ingredients together and add moisture, making your cookie cups fluffy.
- Vanilla extract: A splash of this enhances the overall flavor, making each bite more delightful.
- All-purpose flour: The base of your cookie cups, providing structure and stability.
- Baking soda: This leavening agent helps the cookie cups rise, giving them a light texture.
- Ground cinnamon: A warm spice that brings the essence of fall into your treats.
- Ground nutmeg: Adds a subtle, nutty flavor that complements the pumpkin beautifully.
- Salt: Just a pinch enhances the sweetness and balances the flavors.
- Pumpkin puree: The star of the show! It adds moisture and that signature pumpkin flavor.
- Chocolate chips: These little morsels of joy add a sweet surprise in every bite.
- Green and orange frosting: Perfect for decorating, they transform your cookie cups into a festive pumpkin patch.
- Mini candy pumpkins: These adorable decorations add a fun touch and make your cookie cups even more festive.
For those looking to experiment, consider adding an extra 1/2 cup of pumpkin puree for a more intense flavor. You can find all the exact measurements at the bottom of the article, ready for printing!
How to Make Pumpkin Patch Cookie Cups
Now that you have all your ingredients ready, let’s dive into the fun part—making these delightful Pumpkin Patch Cookie Cups! Follow these simple steps, and you’ll have a batch of delicious treats in no time.
Step 1: Preheat the Oven
First things first, preheat your oven to 350°F (175°C). Preheating is crucial because it ensures even baking. If you skip this step, your cookie cups might not rise properly, leading to a dense texture. So, let that oven warm up while you prepare the dough!
Step 2: Cream the Butter and Sugars
In a large bowl, cream together the softened butter, granulated sugar, and brown sugar until smooth. This process is essential for creating a light and fluffy texture. The air you incorporate while creaming helps the cookie cups rise beautifully. Aim for a pale, creamy mixture that looks inviting!
Step 3: Add Eggs and Vanilla
Next, add the eggs and vanilla extract to the creamed mixture. These ingredients are key players in adding moisture and flavor. The eggs bind everything together, while the vanilla enhances the overall taste, making your cookie cups even more delightful. Mix until everything is well combined.
Step 4: Combine Dry Ingredients
In another bowl, whisk together the all-purpose flour, baking soda, ground cinnamon, ground nutmeg, and salt. Each dry ingredient plays a role: flour provides structure, baking soda helps them rise, and spices bring that warm, cozy flavor. Make sure to mix them well to distribute the baking soda evenly!
Step 5: Mix Wet and Dry Ingredients
Now, gradually add the dry ingredients to the wet mixture. Stir gently until just combined. Be careful not to overmix, as this can lead to tough cookie cups. You want a soft dough that’s slightly sticky but holds together nicely.
Step 6: Fold in Pumpkin and Chocolate Chips
Time to fold in the pumpkin puree and chocolate chips! Gently mix these into the dough, being careful not to overwork it. Folding helps maintain the light texture you’ve created. Plus, the pumpkin adds moisture and that signature fall flavor, while the chocolate chips provide delightful bursts of sweetness.
Step 7: Prepare the Muffin Tin
Grease a muffin tin with cooking spray or butter to prevent sticking. Using a cookie scoop, fill each cup about 2/3 full with the cookie dough. This ensures they have enough room to rise without overflowing. It’s like giving them a cozy little home to bake in!
Step 8: Bake the Cookie Cups
Place the muffin tin in the preheated oven and bake for 12-15 minutes. Keep an eye on them! You’ll know they’re done when the edges are golden brown, and the centers look set. A toothpick inserted in the center should come out clean or with just a few crumbs.
Step 9: Cool and Decorate
Once baked, allow the cookie cups to cool in the tin for about 5 minutes before transferring them to a wire rack. This cooling time helps them firm up. Once they’re completely cool, it’s time to get creative! Decorate with green and orange frosting to resemble a pumpkin patch, and top with mini candy pumpkins for that festive touch.
Tips for Success
- Always use softened butter for easy creaming and a fluffy texture.
- Don’t skip the preheating step; it’s vital for even baking.
- Measure your flour correctly—spoon it into the cup and level it off.
- Let the cookie cups cool completely before decorating for the best results.
- Feel free to get creative with decorations; let your kids join in the fun!

Equipment Needed
- Muffin tin: A standard muffin tin works perfectly, but you can use silicone molds for easy removal.
- Mixing bowls: Use a large bowl for wet ingredients and a medium bowl for dry ingredients.
- Whisk: A whisk is great for combining dry ingredients, but a fork will do in a pinch.
- Cookie scoop: This helps portion the dough evenly; a tablespoon works too!
- Cooling rack: Essential for cooling the cookie cups, but a plate can work in a hurry.
Variations of Pumpkin Patch Cookie Cups
- Gluten-Free: Substitute all-purpose flour with a gluten-free blend to make these cookie cups suitable for gluten-sensitive friends.
- Vegan: Replace eggs with flaxseed meal (1 tablespoon flaxseed meal + 2.5 tablespoons water per egg) and use a plant-based butter alternative.
- Spiced Up: Add a pinch of ground ginger or cloves for an extra kick of fall flavor.
- Nutty Twist: Fold in chopped walnuts or pecans for added crunch and flavor.
- Chocolate Lovers: Use dark chocolate chips or even white chocolate for a different taste experience.
Serving Suggestions for Pumpkin Patch Cookie Cups
- Pair with a warm cup of spiced chai or apple cider for a cozy fall treat.
- Serve alongside a scoop of vanilla ice cream for a delightful dessert experience.
- Arrange on a festive platter with autumn leaves for a beautiful presentation.
- Offer a side of whipped cream for an extra touch of indulgence.
FAQs about Pumpkin Patch Cookie Cups
As you embark on your baking adventure with these delightful Pumpkin Patch Cookie Cups, you might have a few questions. Here are some common queries I’ve encountered, along with helpful answers!
Can I make these cookie cups ahead of time?
Absolutely! You can prepare the dough a day in advance and store it in the fridge. Just remember to let it sit at room temperature for a bit before scooping and baking. This way, you’ll have fresh cookie cups ready to go when you need them!
How should I store leftover cookie cups?
Store your Pumpkin Patch Cookie Cups in an airtight container at room temperature for up to three days. If you want to keep them longer, they can be frozen for up to two months. Just make sure to wrap them well to prevent freezer burn!
Can I use fresh pumpkin instead of canned puree?
Yes, you can! Just make sure to cook and puree the pumpkin until smooth. Canned pumpkin puree is convenient, but fresh pumpkin can add a lovely flavor. Just be sure to drain any excess moisture to avoid a soggy cookie cup.
What can I substitute for chocolate chips?
If chocolate isn’t your thing, feel free to swap in butterscotch chips, white chocolate, or even dried cranberries for a fruity twist. The possibilities are endless, and you can customize these cookie cups to suit your taste!
Can I make these cookie cups gluten-free?
Definitely! Just use a gluten-free flour blend in place of all-purpose flour. This way, everyone can enjoy these festive treats without worry. Just be sure to check that your other ingredients are also gluten-free!
Final Thoughts
Creating these Pumpkin Patch Cookie Cups is more than just baking; it’s about making memories. The aroma of warm spices fills your kitchen, wrapping you in a cozy embrace. Each bite is a delightful reminder of fall, bringing smiles to family and friends alike. Whether you’re decorating with your kids or sharing them at a gathering, these treats spark joy and connection. So, roll up your sleeves, embrace the mess, and enjoy the sweet rewards of your efforts. Trust me, these cookie cups will become a cherished tradition in your home!
Print
Pumpkin Patch Cookie Cups: Delightful Fall Treats to Try!
- Total Time: 35 minutes
- Yield: 24 cookie cups 1x
- Diet: Vegetarian
Description
Pumpkin Patch Cookie Cups are delightful fall treats that combine the flavors of pumpkin and spices in a fun, cookie cup form, perfect for autumn gatherings.
Ingredients
- 1 cup unsalted butter, softened
- 1 cup granulated sugar
- 1 cup brown sugar, packed
- 2 large eggs
- 1 teaspoon vanilla extract
- 2 cups all-purpose flour
- 1 teaspoon baking soda
- 1 teaspoon ground cinnamon
- 1/2 teaspoon ground nutmeg
- 1/2 teaspoon salt
- 1 cup pumpkin puree
- 1 cup chocolate chips
- 1/2 cup green frosting
- 1/2 cup orange frosting
- Mini candy pumpkins for decoration
Instructions
- Preheat the oven to 350°F (175°C).
- In a large bowl, cream together the softened butter, granulated sugar, and brown sugar until smooth.
- Add the eggs and vanilla extract, mixing until well combined.
- In another bowl, whisk together the flour, baking soda, cinnamon, nutmeg, and salt.
- Gradually add the dry ingredients to the wet ingredients, mixing until just combined.
- Fold in the pumpkin puree and chocolate chips.
- Grease a muffin tin and scoop the cookie dough into each cup, filling them about 2/3 full.
- Bake for 12-15 minutes or until the edges are golden brown.
- Allow to cool before decorating with green and orange frosting to resemble a pumpkin patch.
- Top with mini candy pumpkins for a festive touch.
Notes
- For a more intense pumpkin flavor, add an extra 1/2 cup of pumpkin puree.
- Store in an airtight container for up to 3 days.
- These cookie cups can be frozen for up to 2 months.
- Prep Time: 20 minutes
- Cook Time: 15 minutes
- Category: Dessert
- Method: Baking
- Cuisine: American
Nutrition
- Serving Size: 1 cookie cup
- Calories: 180
- Sugar: 12g
- Sodium: 150mg
- Fat: 8g
- Saturated Fat: 5g
- Unsaturated Fat: 2g
- Trans Fat: 0g
- Carbohydrates: 24g
- Fiber: 1g
- Protein: 2g
- Cholesterol: 30mg
Keywords: Pumpkin Patch Cookie Cups, Fall Treats, Pumpkin Cookies, Autumn Desserts