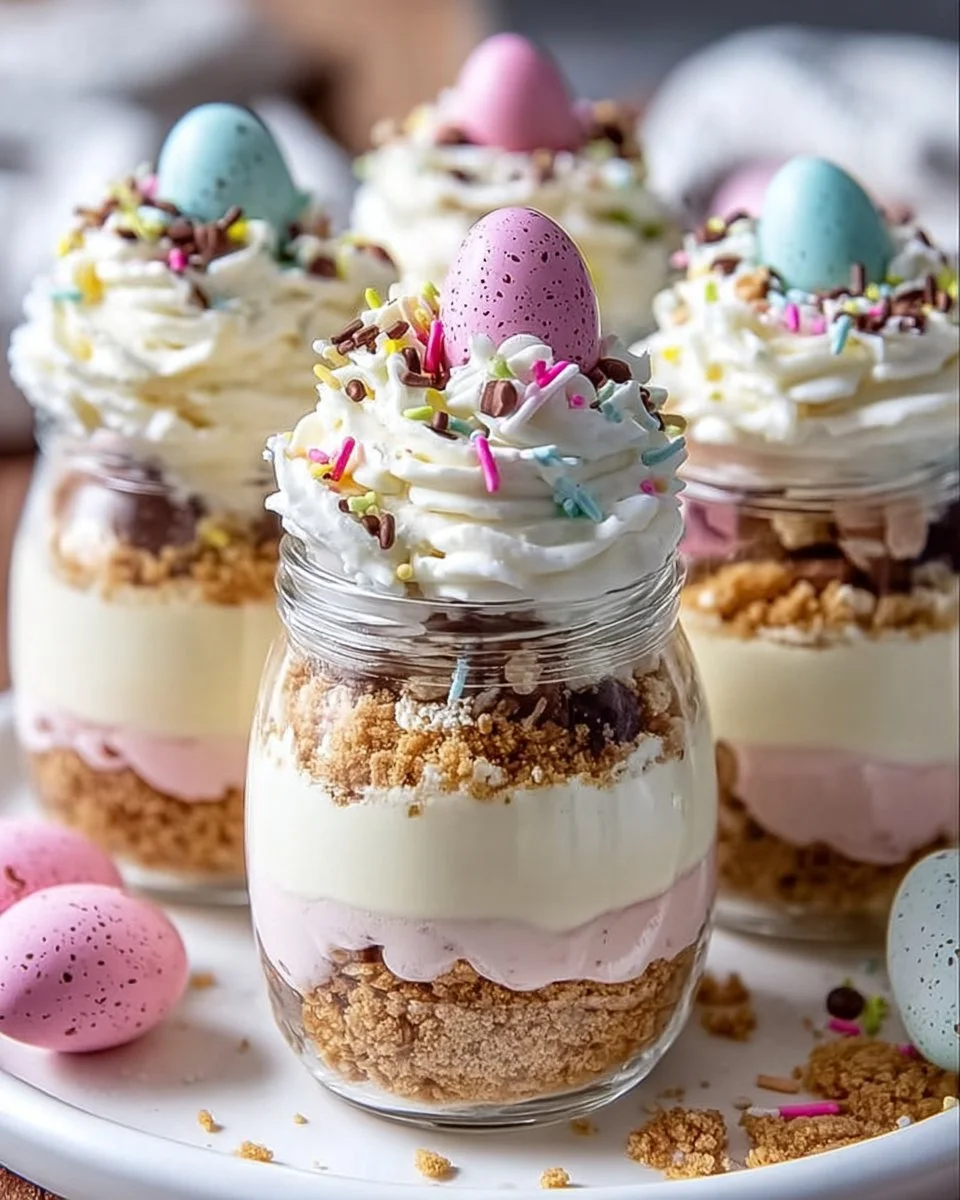
Easter Egg Cheesecake Jars
Easter marks a season of rebirth and joy, where families gather to celebrate with vibrant meals and delicious traditions. This year, elevate your festivities with a magical treat that captures that joyful spirit: Easter Egg Cheesecake Jars. Imagine delicate mousses nestled within sweet, crumbly layers, each spoonful revealing a delicious surprise. The creamy filling plays hide and seek with crunchy bits of chocolate eggs—all presented in charming jars that sparkle with a symphony of seasonal colors.
Picture a warm spring day, as sunlight bathes your dining table and the scent of freshly whipped cream wafts in the air. You serve up these cheesecake jars, adorned with cheerful sprinkles that dance like little confetti on the creamy landscape. Each bite melts on your tongue as dreams of Easter past swirl in your mind. The harmonious blend of sweet, tangy, and crunchy dances delightfully, making every moment spent savoring this dessert pure, unadulterated bliss.
Taking a step back, one cannot help but be enchanted by how these little jars encapsulate the essence of celebration—a personal touch in every layer. The simplicity of creating a dessert that speaks volumes about love and creativity warms the heart and whets the appetite. Let’s dive into the delightful world of Easter Egg Cheesecake Jars and discover why they deserve a place at your holiday table.
Why You’ll Love This Easter Egg Cheesecake Jars
What’s not to adore about these Easter Egg Cheesecake Jars? They combine the beloved flavors of classic cheesecake with a playful twist that is perfect for the holiday. Each creamy layer tastes like a dreamy cloud, enhanced by the subtle sweetness of powdered sugar and the gentle embrace of vanilla. In contrast, the graham cracker crumbs evoke a comforting crunch that sets the stage for a delightful dessert experience.
These jars work beautifully for a variety of occasions beyond Easter, from springtime gatherings to birthday parties. The versatility allows you to personalize each one, creating a unique flavor palette to suit any event. Imagine serving them up at a garden party or taking them along for a picnic—practical and adorable, they make any menu shine. Plus, their charming presentation elevates the simplest get-together into an unforgettable celebration.
Preparation Phase & Tools to Use
Before you dive into creating your delightful dessert, gather your essential tools. Here’s what you’ll need:
- Mixing Bowls: At least two are crucial; one for the creamy cheesecake mixture and the other for your graham cracker crumbs. The size matters—large bowls make whisking and folding easier.
- Electric Mixer or Whisk: An electric mixer quickens the process, ensuring your cream cheese can reach that perfectly smooth consistency. A simple whisk works for a more hands-on approach, but it requires patience.
- Spatula: A silicone spatula is perfect for folding in the whipped cream without losing that airy texture.
- Serving Jars: Choose jars that hold 8 oz or so, perfect for individual servings—cute and functional!
Practical Preparation Tips
- Prep your cream cheese ahead of time. Allow it to soften at room temperature to ensure a smooth blend.
- Crush the graham crackers. Utilize a food processor or a ziplock bag with a rolling pin for achieving that perfect crumb texture.
Ingredients for Easter Egg Cheesecake Jars
Gather these heavenly ingredients, each with its unique contribution to the dish:
- 8 oz cream cheese, softened: The foundation of your cheesecake, cream cheese brings a luscious texture. You can substitute with mascarpone for a different flavor profile.
- 1/2 cup powdered sugar: This adds sweetness while ensuring a smooth finish; consider lowering the amount for a less sweet treat.
- 1 teaspoon vanilla extract: The warm, aromatic flavor of vanilla elevates the experience; opt for pure vanilla extract for an authentic taste.
- 1 cup whipped cream: The lightness of whipped cream creates airy layers—homemade is best, but store-bought can work in a pinch!
- 1 cup graham cracker crumbs: This crunchy layer gives a delightful contrast; feel free to use gluten-free versions as a substitute.
- 1/2 cup chocolate eggs or candy eggs, crushed: These little morsels offer sweetness and texture. You can interchange them with any favorite chocolate candy for variety.
- Food coloring (optional): Bright hues add a festive touch, enhancing visual appeal.
- Spring-themed sprinkles (for decoration): A cherry on top, these sprinkles make your jars festive and fun.
How to Make Easter Egg Cheesecake Jars
Creating these jars is as enjoyable as indulging in them! Follow these easy steps:
-
Beat the Cream Cheese: In a mixing bowl, beat the softened cream cheese until it’s velvety smooth, ensuring no lumps remain. This sets the stage for a creamy texture.
-
Mix and Sweeten: Add the powdered sugar and vanilla extract to the bowl. Blend until these ingredients create a rich, sweet filling.
-
Gently Fold: Carefully fold in the whipped cream until fully incorporated, maintaining that delightful fluffiness.
-
Layer the Crumbs: In your jars, begin with a layer of graham cracker crumbs at the bottom. This creates a tasty and firm base for your cheesecake.
-
Add the Cheesecake Mixture: Spoon a generous dollop of the cheesecake mixture into each jar, savoring the creamy decadence.
-
Crush and Sprinkle: Sprinkle crushed chocolate eggs on top of this layer, adding a delightful crunch that contrasts beautifully with the creaminess.
-
Repeat Layers: Continue alternating layers of graham cracker crumbs and cheesecake mixture until you’ve filled the jars to the brim.
-
Add Color (Optional): If you wish, add a few drops of food coloring to the creamy mixture before layering for a fun spring palette.
-
Sprinkle for Fun: Top the jars with an abundance of spring-themed sprinkles, making them Instagram-ready and irresistible.
-
Chill Out: Place the jars in the fridge for at least an hour (or more) to allow the flavors to meld together gracefully.
Chef’s Notes & Helpful Tips
-
Make-ahead tip: Prepare the jars the night before and let them chill overnight for an enhanced flavor experience, allowing the sweet layers to set beautifully.
-
Cooking alternatives: While the jars are best chilled, you can adapt the recipe to a traditional cheesecake pan. Just bake the mixture for a slightly longer time, and then let it cool before slicing.
-
Customization ideas: Play around with flavors! Incorporate fruits like strawberries or blueberries, or add a hint of almond extract for a unique twist.
Common Mistakes to Avoid
Avoid common mishaps to ensure your cheesecake jars shine.
- Overshooting Sugar: Too much powdered sugar can overpower the subtle flavors. Taste as you go!
- Warmed Cream Cheese: If the cream cheese isn’t at room temperature, expect lumps—nobody wants that.
- Overmixing: While incorporating whipped cream, fold gently. Excess mixing results in a dense texture, robbing your dessert of its lightness.
What to Serve With Easter Egg Cheesecake Jars
Enhance your dessert table with delightful accompaniments:
- Fresh Berries: Seasonal strawberries, raspberries, or blueberries bring a burst of freshness that pairs beautifully with the creaminess.
- Mint Leaves: A sprig of mint adds a refreshing touch, perfect alongside the rich cheesecake.
- Coffee or Espresso: The bitter notes of coffee balance the sweetness of the jars, offering a delightful contrast.
- Lemonade or Iced Tea: Refreshing beverages bring a zest that perfectly syncs with Easter brunch vibes.
- Pistachios or Almonds: Crushed nuts elevate textures and flavors, adding an unexpected crunch.
- Chocolate Sauce: Drizzling your cheesecake jars with a rich chocolate sauce transforms them into an even more decadent dessert.
Storage & Reheating Instructions
To keep your jars fresh and luscious, store them in an airtight container in the refrigerator. Enjoy them within three to four days for optimal flavor and texture. If you prepare them ahead of time, they store beautifully and make for a stress-free treat!
Reheating isn’t necessary and could spoil the creamy consistency. You can enjoy these jars cold, enhancing their refreshing qualities during warm celebrations.
Estimated Nutrition Information
While it varies based on preparation methods, one jar of Easter Egg Cheesecake contains approximately:
- Calories: 290
- Total Fat: 18g
- Saturated Fat: 10g
- Cholesterol: 50mg
- Sodium: 220mg
- Total Carbohydrate: 29g
- Sugars: 18g
- Protein: 4g
Keep in mind these values are estimates and can vary greatly based on specific ingredient brands and quantities used.
FAQs
Can I use low-fat cream cheese?
Yes, you can substitute reduced-fat cream cheese, although the texture may be slightly less rich and creamy.
What can I use instead of whipped cream?
You can use stabilized whipped topping or make a vegan version with coconut cream, although the flavor and texture may differ.
How can I make these gluten-free?
Simply use gluten-free graham crackers or another gluten-free crumb option, like crushed almonds or gluten-free cookies.
Can I freeze these jars?
While the cheesecake filling freezes reasonably well, the texture upon thawing may not be optimal. Still, if you must freeze, do so before adding toppings; assemble them fresh after thawing.
How long can I keep these jars?
They should maintain their quality in the refrigerator for 3 to 4 days, making them perfect for planning ahead.
Conclusion
Unleash the magic of spring with Easter Egg Cheesecake Jars, the perfect blend of playfulness and sophistication. The scrumptious layers of creaminess contrasting with crunchy elements create an unforgettable dessert worthy of any table, especially during the holiday’s festive spirit. As the flavors dance on your palate and the charm of these jars surrounds you, you’ll feel the warmth of celebration and community. So, gather your loved ones, roll up your sleeves, and embark on this delightful journey in the kitchen. Trust me, these jars will quickly become a treasured staple in your holiday repertoire, spreading smiles with every spoonful! Enjoy your delicious creation!
Print
Easter Egg Cheesecake Jars
- Total Time: 80 minutes
- Yield: 4 servings 1x
- Diet: Vegetarian
Description
Delight in these charming Easter Egg Cheesecake Jars, featuring layers of creamy cheesecake and crunchy chocolate eggs.
Ingredients
- 8 oz cream cheese, softened
- 1/2 cup powdered sugar
- 1 teaspoon vanilla extract
- 1 cup whipped cream
- 1 cup graham cracker crumbs
- 1/2 cup chocolate eggs or candy eggs, crushed
- Food coloring (optional)
- Spring-themed sprinkles (for decoration)
Instructions
- Beat the cream cheese until it’s velvety smooth.
- Mix in the powdered sugar and vanilla extract until well blended.
- Gently fold in the whipped cream.
- Layer graham cracker crumbs at the bottom of the jars.
- Add a dollop of the cheesecake mixture into each jar.
- Sprinkle crushed chocolate eggs on top.
- Repeat layers until the jars are filled.
- Add food coloring if desired.
- Sprinkle with spring-themed sprinkles for decoration.
- Chill for at least one hour before serving.
Notes
These jars can be made ahead of time and stored in the refrigerator for up to 3 to 4 days.
- Prep Time: 20 minutes
- Cook Time: 0 minutes
- Category: Dessert
- Method: No-Bake
- Cuisine: American
Nutrition
- Serving Size: 1 jar
- Calories: 290
- Sugar: 18g
- Sodium: 220mg
- Fat: 18g
- Saturated Fat: 10g
- Unsaturated Fat: 8g
- Trans Fat: 0g
- Carbohydrates: 29g
- Fiber: 1g
- Protein: 4g
- Cholesterol: 50mg
Keywords: Easter, dessert, cheesecake, no-bake, spring treats