Red Velvet Cheesecake Cupcakes

As a busy mom, I know how precious time can be, especially when it comes to baking. That’s why I absolutely adore these Red Velvet Cheesecake Cupcakes! They’re not just a treat; they’re a delightful surprise that combines the rich, velvety goodness of red velvet cake with the creamy indulgence of cheesecake. Perfect for a quick dessert after dinner or a sweet surprise for your loved ones, these cupcakes are sure to impress. Plus, they’re simple enough to whip up even on the busiest of days. Let’s dive into this delicious adventure together!
Why You’ll Love This Red Velvet Cheesecake Cupcakes
These Red Velvet Cheesecake Cupcakes are a dream come true for anyone who loves dessert but is short on time. They’re quick to make, taking just about an hour from start to finish. The combination of flavors is simply irresistible, with the rich red velvet cake perfectly complementing the creamy cheesecake filling. Plus, they’re a hit with both kids and adults, making them a fantastic choice for any occasion!
Ingredients for Red Velvet Cheesecake Cupcakes
Gathering the right ingredients is the first step to creating these delightful Red Velvet Cheesecake Cupcakes. Here’s what you’ll need:
- All-purpose flour: This is the base of your cupcakes, giving them structure and a soft texture.
- Granulated sugar: Sweetness is key! It balances the flavors and helps create a moist cupcake.
- Unsweetened cocoa powder: This adds a rich chocolate flavor, enhancing the red velvet experience.
- Baking soda: A leavening agent that helps the cupcakes rise, making them light and fluffy.
- Salt: Just a pinch enhances the sweetness and balances the flavors beautifully.
- Vegetable oil: This keeps the cupcakes moist and tender, giving them that melt-in-your-mouth quality.
- Buttermilk: Adds a tangy flavor and helps create a soft texture. You can substitute with regular milk mixed with a bit of vinegar.
- Large eggs: They bind the ingredients together and add richness to the cupcakes.
- Red food coloring: This gives the cupcakes their signature vibrant hue. You can use gel or liquid, depending on your preference.
- Vanilla extract: A must-have for flavor! It adds warmth and depth to the batter.
- Cream cheese: The star of the cheesecake filling! It provides that creamy, tangy goodness.
- Powdered sugar: This sweetens the cheesecake filling and helps it achieve a smooth texture.
- Heavy cream: Used for the frosting, it creates a light and fluffy topping that’s hard to resist.
- More powdered sugar (for frosting): This sweetens the frosting and helps it hold its shape.
- Vanilla extract (for frosting): Just like in the batter, it adds a lovely flavor to the frosting.
For exact measurements, check the bottom of the article where you can find everything listed for easy printing. Happy baking!
How to Make Red Velvet Cheesecake Cupcakes
Step 1: Preheat and Prepare
First things first, preheat your oven to 350°F (175°C). This ensures your Red Velvet Cheesecake Cupcakes bake evenly. While the oven warms up, line a cupcake pan with liners. I love using colorful liners to add a fun touch! This step is crucial because it keeps your cupcakes from sticking and makes cleanup a breeze. Trust me, you’ll thank yourself later!
Step 2: Mix Dry Ingredients
In a large mixing bowl, combine the all-purpose flour, granulated sugar, cocoa powder, baking soda, and salt. Whisk them together until they’re well blended. This step is important because it ensures that the leavening agent is evenly distributed. A good mix will help your cupcakes rise beautifully. Plus, the aroma of cocoa powder is simply delightful!
Step 3: Combine Wet Ingredients
In a separate bowl, whisk together the vegetable oil, buttermilk, eggs, red food coloring, and vanilla extract. Make sure everything is well combined. The oil and buttermilk will keep your cupcakes moist, while the red food coloring gives them that signature hue. Don’t skip the vanilla; it adds a lovely depth of flavor that makes these cupcakes irresistible!
Step 4: Combine Wet and Dry Mixtures
Now, it’s time to bring the wet and dry ingredients together. Pour the wet mixture into the bowl with the dry ingredients. Gently mix until just combined. Be careful not to overmix; this keeps your cupcakes light and fluffy. A few lumps are perfectly fine! The batter should be smooth and vibrant, ready to be transformed into something delicious.
Step 5: Prepare the Cheesecake Filling
In another bowl, beat the softened cream cheese, powdered sugar, and vanilla extract until smooth. This cheesecake filling is the heart of your cupcakes! Make sure there are no lumps, as a creamy filling will create a delightful surprise in every bite. If you want to get fancy, you can add a splash of lemon juice for a zesty twist!
Step 6: Fill the Cupcake Liners
Now comes the fun part! Fill each cupcake liner halfway with the red velvet batter. Then, add a generous spoonful of the cheesecake filling right in the center. Finally, cover the cheesecake with more red velvet batter until the liners are about two-thirds full. This layering creates that beautiful contrast when you bite into the cupcakes. It’s like a little surprise waiting to be discovered!
Step 7: Bake the Cupcakes
Place the cupcake pan in the preheated oven and bake for 20-25 minutes. To check for doneness, insert a toothpick into the center of a cupcake. If it comes out clean or with a few moist crumbs, they’re ready! The smell wafting through your kitchen will be heavenly. Just try not to open the oven door too soon; we want those cupcakes to rise perfectly!
Step 8: Cool the Cupcakes
Once baked, remove the cupcakes from the oven and let them cool in the pan for about 5 minutes. Then, transfer them to a wire rack to cool completely. This step is crucial because frosting warm cupcakes can lead to a melty mess. Patience is key here; trust me, the wait will be worth it when you taste them!
Step 9: Make the Frosting
For the frosting, whip the heavy cream in a bowl until soft peaks form. Gradually add the powdered sugar and vanilla extract, mixing until well combined. This whipped cream frosting is light and fluffy, perfectly complementing the rich flavors of the cupcakes. It’s like a cloud of sweetness on top of your delicious creation!
Step 10: Frost the Cupcakes
Finally, it’s time to frost your cooled cupcakes! Use a piping bag or a simple spatula to spread the whipped cream frosting generously on top. Feel free to get creative with your frosting technique! A little sprinkle of cocoa powder or red velvet crumbs on top can add a lovely finishing touch. Your Red Velvet Cheesecake Cupcakes are now ready to shine!
Tips for Success
- Make sure your cream cheese is at room temperature for easy mixing.
- Don’t overmix the batter; it keeps your cupcakes light and fluffy.
- Use gel food coloring for a more vibrant hue without altering the batter’s consistency.
- Let the cupcakes cool completely before frosting to avoid melting.
- Store leftovers in the refrigerator for up to 3 days for the best taste.
Equipment Needed
- Cupcake pan: A standard 12-cup pan works perfectly. You can also use silicone molds for easy removal.
- Mixing bowls: A set of various sizes is handy for mixing ingredients.
- Whisk: Essential for blending dry and wet ingredients smoothly.
- Electric mixer: Great for beating the cream cheese and whipping the frosting.
- Piping bag or spatula: For frosting your cupcakes with style!
Variations
- Chocolate Chip Surprise: Add mini chocolate chips to the red velvet batter for an extra burst of flavor.
- Nutty Delight: Incorporate chopped walnuts or pecans into the cheesecake filling for a delightful crunch.
- Gluten-Free Option: Substitute all-purpose flour with a gluten-free blend to make these cupcakes suitable for gluten-sensitive friends.
- Vegan Twist: Use plant-based cream cheese, almond milk, and flax eggs to create a vegan version of these cupcakes.
- Fruit Infusion: Add a layer of raspberry or strawberry jam between the red velvet batter and cheesecake filling for a fruity surprise.
Serving Suggestions
- Pair these cupcakes with a scoop of vanilla ice cream for a delightful dessert experience.
- Serve alongside a steaming cup of coffee or tea to balance the sweetness.
- For a festive touch, garnish with fresh berries or mint leaves on top.
- Display on a beautiful cake stand for an eye-catching presentation at gatherings.
FAQs about Red Velvet Cheesecake Cupcakes
Can I make these Red Velvet Cheesecake Cupcakes ahead of time?
Absolutely! You can bake the cupcakes a day in advance. Just store them in an airtight container at room temperature. Frost them on the day you plan to serve for the best texture and flavor.
What can I use instead of buttermilk?
If you don’t have buttermilk on hand, you can easily make a substitute. Just mix one cup of regular milk with a tablespoon of vinegar or lemon juice. Let it sit for about 5 minutes, and you’re good to go!
How do I store leftover cupcakes?
Store any leftover Red Velvet Cheesecake Cupcakes in the refrigerator. They’ll stay fresh for up to three days. Just make sure they’re in an airtight container to keep them moist and delicious!
Can I freeze these cupcakes?
Yes, you can freeze the cupcakes! Just make sure they’re completely cooled. Wrap them tightly in plastic wrap and place them in a freezer-safe container. They can be frozen for up to three months. Thaw them in the fridge before frosting.
What’s the best way to frost these cupcakes?
For a beautiful finish, use a piping bag with a star tip to frost your cupcakes. This adds a lovely swirl and makes them look extra special. If you don’t have a piping bag, a simple spatula works just fine!
Final Thoughts
Creating these Red Velvet Cheesecake Cupcakes is more than just baking; it’s about sharing joy and deliciousness with those you love. Each bite is a delightful blend of flavors that brings smiles and happy memories. Whether it’s a special occasion or just a sweet treat after a long day, these cupcakes are sure to brighten anyone’s mood. Plus, the process is simple enough to fit into your busy schedule. So, roll up your sleeves, gather your ingredients, and let the magic happen in your kitchen. You won’t regret it, and neither will your taste buds!
Print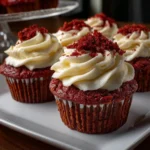
Red Velvet Cheesecake Cupcakes
- Total Time: 55 minutes
- Yield: 12 cupcakes 1x
- Diet: Vegetarian
Description
Red Velvet Cheesecake Cupcakes are a delightful combination of rich red velvet cake and creamy cheesecake, topped with a luscious cream cheese frosting.
Ingredients
- 1 1/2 cups all-purpose flour
- 1 cup granulated sugar
- 1/2 cup unsweetened cocoa powder
- 1 teaspoon baking soda
- 1 teaspoon salt
- 1 cup vegetable oil
- 1 cup buttermilk
- 2 large eggs
- 2 tablespoons red food coloring
- 1 teaspoon vanilla extract
- 8 oz cream cheese, softened
- 1/2 cup powdered sugar
- 1 teaspoon vanilla extract (for cheesecake)
- 1/2 cup heavy cream (for frosting)
- 1 cup powdered sugar (for frosting)
- 1 teaspoon vanilla extract (for frosting)
Instructions
- Preheat the oven to 350°F (175°C) and line a cupcake pan with liners.
- In a large bowl, mix together the flour, sugar, cocoa powder, baking soda, and salt.
- In another bowl, whisk together the oil, buttermilk, eggs, food coloring, and vanilla extract.
- Combine the wet and dry ingredients until just mixed.
- In a separate bowl, beat the cream cheese, powdered sugar, and vanilla extract until smooth to make the cheesecake filling.
- Fill each cupcake liner halfway with red velvet batter, then add a spoonful of cheesecake filling on top, and cover with more red velvet batter.
- Bake for 20-25 minutes or until a toothpick comes out clean.
- Let the cupcakes cool completely.
- For the frosting, whip the heavy cream until soft peaks form, then gradually add powdered sugar and vanilla extract until well combined.
- Frost the cooled cupcakes with the whipped cream frosting.
Notes
- Ensure the cream cheese is at room temperature for easy mixing.
- Do not overmix the batter to keep the cupcakes light and fluffy.
- These cupcakes can be stored in the refrigerator for up to 3 days.
- Prep Time: 30 minutes
- Cook Time: 25 minutes
- Category: Dessert
- Method: Baking
- Cuisine: American
Nutrition
- Serving Size: 1 cupcake
- Calories: 350
- Sugar: 25g
- Sodium: 200mg
- Fat: 20g
- Saturated Fat: 10g
- Unsaturated Fat: 5g
- Trans Fat: 0g
- Carbohydrates: 40g
- Fiber: 1g
- Protein: 4g
- Cholesterol: 50mg
Keywords: Red Velvet, Cheesecake, Cupcakes, Dessert, Baking