Pilgrim Hat Cookies: The Ultimate Thanksgiving Treat!
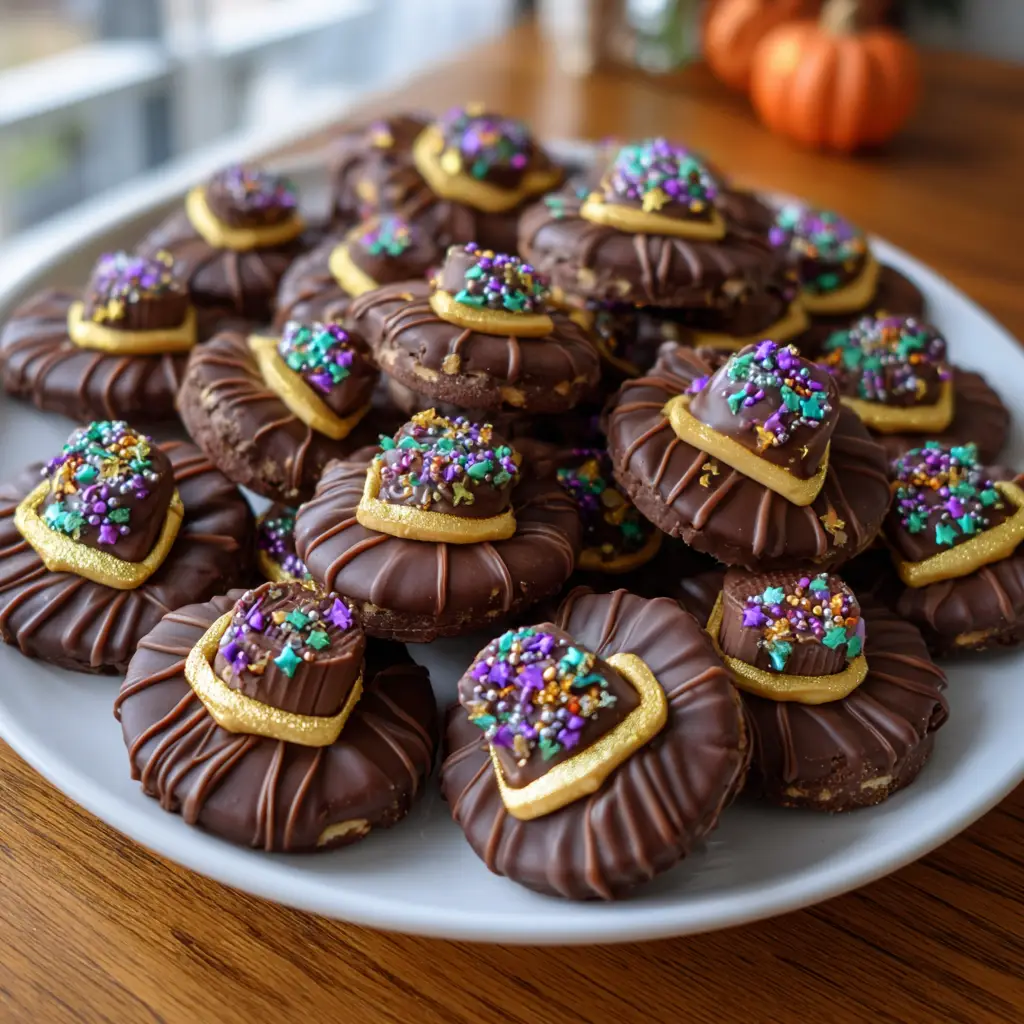
Introduction to Pilgrim Hat Cookies
As the leaves turn and the air gets crisp, I find myself dreaming of Thanksgiving treats that bring joy to my family. One of my absolute favorites is Pilgrim Hat Cookies. These delightful little confections are not only adorable but also incredibly easy to whip up, making them a perfect solution for busy days. Whether you’re hosting a gathering or just want to impress your loved ones, these cookies are sure to bring smiles. Plus, they require no baking, which means less time in the kitchen and more time enjoying the festivities!
Why You’ll Love This Pilgrim Hat Cookies
These Pilgrim Hat Cookies are a game-changer for any busy mom or professional. They come together in just 15 minutes, making them a quick and delightful treat. The combination of chocolate and peanut butter is simply irresistible, and the festive look adds a touch of whimsy to your Thanksgiving table. Plus, they’re a hit with kids and adults alike, ensuring everyone leaves with a smile!
Ingredients for Pilgrim Hat Cookies
Gathering the right ingredients is the first step to creating these delightful Pilgrim Hat Cookies. Here’s what you’ll need:
- Chocolate wafer cookies: These serve as the base of your hats. Their crisp texture pairs perfectly with the frosting.
- Chocolate frosting: This creamy goodness not only adds flavor but also acts as the glue to hold everything together.
- Candy corn: These colorful candies are the finishing touch, giving your cookies that iconic pilgrim hat look.
- Mini peanut butter cups: Upside down, they become the crown of your hats, adding a rich, nutty flavor that’s hard to resist.
Feel free to get creative! You can swap out the chocolate frosting for vanilla if you prefer a lighter taste. If you’re looking for a nut-free option, consider using sunflower seed butter cups instead of peanut butter cups. The exact quantities for each ingredient are available at the bottom of the article for easy printing.
How to Make Pilgrim Hat Cookies
Step 1: Prepare the Cookies
To start, grab a baking sheet and line it with parchment paper for easy cleanup. Next, take your chocolate wafer cookies and place them evenly on the sheet. Make sure they have enough space between them, as you’ll be adding frosting and toppings. This step is simple but crucial, as it sets the stage for your delicious Pilgrim Hat Cookies. The crispness of the cookies will provide a delightful contrast to the creamy frosting and rich peanut butter cups. Trust me, your family will love this festive treat!
Step 2: Frost the Cookies
Now comes the fun part! Using a knife or a spatula, spread a generous layer of chocolate frosting on top of each cookie. Don’t be shy with the frosting; it’s what makes these cookies so decadent. Aim for an even layer, but a little extra never hurts! The frosting acts as both a delicious flavor enhancer and a sticky base for the peanut butter cups. As you frost, imagine the smiles on your loved ones’ faces when they see these adorable treats. It’s all about creating joy in the kitchen!
Step 3: Add the Peanut Butter Cups
Once your cookies are frosted, it’s time to add the mini peanut butter cups. Take each cup and place it upside down in the center of the frosted cookie. This creates the “hat” part of your Pilgrim Hat Cookies. Press down gently to ensure they stick well. The combination of chocolate and peanut butter is a match made in heaven! As you do this, you might find yourself sneaking a taste of the peanut butter cups. I won’t tell if you don’t!
Step 4: Top with Candy Corn
To complete the pilgrim hat look, it’s time to add the finishing touch: candy corn! Carefully place a piece of candy corn on top of each peanut butter cup. This bright, colorful candy adds a festive flair and a touch of sweetness. It’s like the cherry on top of a sundae! As you add the candy corn, take a moment to appreciate how cute these cookies are starting to look. They’re not just treats; they’re little works of art that will brighten up your Thanksgiving table!
Step 5: Let Set and Serve
After assembling your Pilgrim Hat Cookies, let them set for a few minutes. This allows the frosting to firm up a bit, making them easier to handle. While you wait, you can admire your handiwork and maybe even sneak a taste of the leftovers! Once they’re set, they’re ready to be served. Place them on a festive platter and watch as your family gathers around, eager to dig in. These cookies are not just a treat; they’re a delightful way to celebrate the season!
Tips for Success
- Use fresh ingredients for the best flavor and texture.
- Don’t rush the frosting; a thick layer helps everything stick together.
- Experiment with different toppings like sprinkles for added fun!
- Keep your workspace organized to make the process smoother.
- Store any leftovers in an airtight container to maintain freshness.
Equipment Needed
- Baking sheet: A standard baking sheet works perfectly, but a large platter can also do the trick.
- Parchment paper: This makes cleanup a breeze; aluminum foil is a good alternative.
- Knife or spatula: Use a butter knife for spreading frosting, or a small offset spatula for precision.
- Serving platter: Any decorative plate will showcase your cookies beautifully.
Variations of Pilgrim Hat Cookies
- Nut-Free Option: Swap mini peanut butter cups for sunflower seed butter cups to make these cookies safe for those with nut allergies.
- Gluten-Free Version: Use gluten-free chocolate wafer cookies to accommodate gluten sensitivities while still enjoying the festive treat.
- Flavor Twist: Try using flavored frosting, like vanilla or caramel, for a unique taste that adds a fun twist to the classic recipe.
- Decorative Touch: Add edible glitter or sprinkles on top of the frosting for an extra festive flair that will dazzle your guests.
- Fruit Topping: For a healthier option, replace candy corn with small pieces of dried fruit, like apricots or cranberries, for a chewy texture.
Serving Suggestions for Pilgrim Hat Cookies
- Pair these cookies with a warm cup of apple cider for a cozy fall treat.
- Serve alongside a platter of fresh fruit to balance the sweetness.
- Present them on a festive Thanksgiving-themed platter for a charming display.
- Consider adding a scoop of vanilla ice cream for an indulgent dessert experience.
FAQs about Pilgrim Hat Cookies
Can I make Pilgrim Hat Cookies ahead of time?
Absolutely! These cookies can be made a day in advance. Just store them in an airtight container to keep them fresh. This way, you can enjoy more time with your family on Thanksgiving Day!
What can I use instead of chocolate frosting?
If chocolate isn’t your thing, feel free to swap it out for vanilla frosting. It adds a lighter flavor and still complements the chocolate wafer cookies beautifully. You can even try cream cheese frosting for a tangy twist!
How do I store leftover Pilgrim Hat Cookies?
To keep your cookies fresh, store them in an airtight container at room temperature. They should last for about three days. If you want to keep them longer, consider refrigerating them, but let them come to room temperature before serving.
Can I use different candies for decoration?
Definitely! While candy corn is traditional, you can get creative with other candies. Mini chocolate chips, M&M’s, or even gummy candies can add a fun twist to your Pilgrim Hat Cookies!
Are Pilgrim Hat Cookies suitable for kids to make?
Yes! These cookies are a fantastic project for kids. They can help with frosting and placing the toppings. Just supervise them with the knife and enjoy the laughter and creativity in the kitchen!
Final Thoughts
Creating Pilgrim Hat Cookies is more than just baking; it’s about making memories with your loved ones. The joy of seeing their faces light up as they indulge in these festive treats is priceless. Each cookie is a little celebration, a reminder of the warmth and togetherness that Thanksgiving brings. Plus, the simplicity of this recipe means you can focus on what truly matters—spending time with family and friends. So, roll up your sleeves, gather your ingredients, and let the laughter and creativity flow in your kitchen. Happy baking, and may your Thanksgiving be filled with love and delicious treats!
Print
Pilgrim Hat Cookies: The Ultimate Thanksgiving Treat!
- Total Time: 15 minutes
- Yield: 24 cookies 1x
- Diet: Vegetarian
Description
Delicious and festive cookies shaped like pilgrim hats, perfect for Thanksgiving celebrations.
Ingredients
- 1 package of chocolate wafer cookies
- 1 package of chocolate frosting
- 1 package of candy corn
- 1 package of mini peanut butter cups
Instructions
- Start by placing the chocolate wafer cookies on a baking sheet.
- Using a knife or spatula, spread a layer of chocolate frosting on top of each cookie.
- Take a mini peanut butter cup and place it upside down in the center of each frosted cookie.
- Finally, add a piece of candy corn on top of the peanut butter cup to complete the pilgrim hat look.
- Let the cookies set for a few minutes before serving.
Notes
- These cookies can be made ahead of time and stored in an airtight container.
- Feel free to get creative with decorations!
- Make sure to use fresh ingredients for the best taste.
- Prep Time: 15 minutes
- Cook Time: 0 minutes
- Category: Dessert
- Method: No-bake
- Cuisine: American
Nutrition
- Serving Size: 1 cookie
- Calories: 120
- Sugar: 10g
- Sodium: 50mg
- Fat: 6g
- Saturated Fat: 2g
- Unsaturated Fat: 4g
- Trans Fat: 0g
- Carbohydrates: 15g
- Fiber: 1g
- Protein: 2g
- Cholesterol: 5mg
Keywords: Pilgrim Hat Cookies, Thanksgiving Treat, Holiday Cookies